I remember when I opened Photoshop for the first time I was dazzled by all the buttons, options and tools. It took me some time to get accustomed to the interface and when I was familiar enough with it I modified it so it would meet my specific needs. Don’t worry, I will guide you through the interface so at the end of this article you will have a pretty good understanding of the Photoshop interface.
View Other Articles in This Series
- How to set up Photoshop
- Photoshop Interface Explained (Part 1)
- Photoshop Interface Explained (Part 2)
- Introduction to the Photoshop Toolbar (Part 1)
- Introduction to the Photoshop Toolbar (Part 2)
- Introduction to the Photoshop Toolbar (Part 3)
- Photoshop Channels and Color
- Photoshop Selections (Part 1)
- Photoshop Selections (Part 2)
- Photoshop Layers
Take a look at the image below. You can see that there are 3 horizontal bars (Application Bar, Menu Bar, Options Bar) and 3 vertical “bars” (Tools Panel, Image Window, Docked Panels). Ok, the last 3 are not really bars, but let’s call them bars for the sake of explanation. First thing to know is that you cannot modify, move or resize the 3 horizontal upper bars (except for the Application Bar which can be “squeezed” so it fits on the same bar with the Menu Bar, thus gaining us some precious space ) and you can move, resize and modify the 3 vertical “bars” (Tools Panel, Image Window, Docked Panels).

Application Bar
Well, because it is an application bar you can close, minimize or maximize your main application (Photoshop) and you can open other applications by clicking a button (Bridge), change a workspace, change the zoom level, change the screen mode and show extras. I personally find most of the features of the Application Bar useless because I have some better ways to get access to them without taking my eyes from the image I am working on and those ways are keyboard shortcuts. They are a huge time saver and make navigation a breeze. Once you will learn the shortcuts you will find it very clumsy to go back to pushing various buttons so hang on with me as I reveal them to you.

Ok, so the only useful buttons I ever use are (highlighted with red):
- Close, Minimize, Maximize. That is when I am lazy and I don’t use the keyboard shortcut for Close ( Ctr+q);
- Show more workspaces and options. This is especially useful when you resize the Application bar until it fits on the same line with the Menu Bar (I will show you this feature next);
- Workspaces Area. Here you can see what your working space is and the other available workspaces;
- Resize button. When you put your mouse over this button a specific drag icon appears and if you drag it to the left you will extend the Workspace Area showing more workspaces. If you drag to the right it will reduce the Workspace Area. Drag it to the maximum extent to the right and the Menu Bar will magically go up to sit on the same line with the Application Bar. Well, not really magically, but once you make enough room Photoshop will do this for you. This feature is great because it will give you some more space to view your image. You can see below how the Application and the Menu Bar on the same line. Try to do this yourself and then leave it this way.
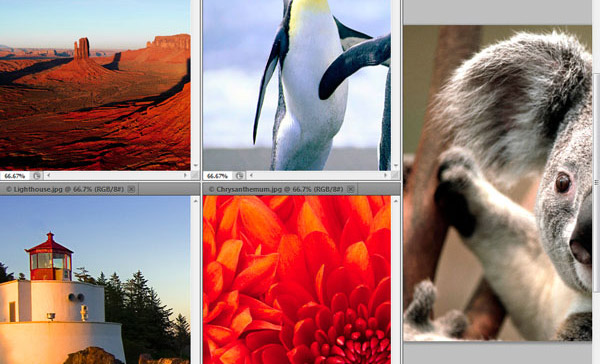
- Arrange Documents. This button is useful when you have two or more images opened and you want to see them both in the same window. When you click this button you are presented with a list of self explanatory icons which when clicked arrange your windows one way or another. Below the icons you will see a bunch of commands which perform some tasks.
- “Float all in Windows” will remove the images from their tabbed environment (we will get to this later in the article) and floats them in separate windows;
- “New Window” makes a duplicate of the current window (all the changes you make in one window are automatically applied to the second window. If you want to apply different changes to each window you should use Image > Duplicate or you can click “Create new document from current state” button from the History panel);
- “Actual Pixels” matches the zoom level of the image to the actual resolution of the screen (we will learn about that in a future article);
- “Fit on Screen” modifies the zoom level so the whole image is visible on the screen;
- If you have at least 2 images tiled on the screen and you are zoomed in at let’s say 500% in the first image then “Match Zoom” will zoom the second image at the same level. If you zoomed in in the first image and you are viewing the lower left corner then by pressing “Match Location” than you will be seeing the lower left corner of the second image. “Match Zoom and Location” modifies both the location and the zoom of the second image. When I say first image I mean the active image, or the image on which you are working on. The second image represents the inactive image or the out of focus image. That is you are not actively working or viewing this image. Of course these 3 commands (“Match Zoom”, “Match Location”, “Match Zoom and Location”) work on more than 2 images. Just remember that the image you are working on or viewing is the active image and the rest are inactive (or out of focus) images;

To return to the default image view just press “Consolidate All”.

Below you can see “Arrange documents” in action. In this specific case I choose the “Tile all in a grid” icon (second upper icon from left to right).

Ok, now for the less useful ( or less used ) buttons:
- Screen Mode. You can use the keyboard shortcut ( F ) to cycle through the 3 screen modes. Standard Screen mode it is as its name suggests the standard, default screen mode.
“Full Screen Mode With Menu Bar” gets rid of the Windows Taskbar (I don’t know the exact behavior on a Mac but I presume it is basically the same), the tabs bar, the status bar and the scroll area.
“Full Screen Mode” gets rid of everything but the image. It usually displays a black background but you can right click and choose a custom background. If you are in “Fullscren mode” and you want to bring up the Tools panel, the Docked panels and the 3 upper bars then press Tab. If you want to bring up just the Docked panels then press Shift+Tab. Also if you go with your mouse near the left or right edge the Tools or the Docked Panels will temporarily appear and disappear when you move your mouse away.
- Zoom Level. Here you can select a zoom level. I never used this button because I do all my zooming from the keyboard. I will detail navigation in a future article but here’s the fastest way to zoom around in Photoshop: Hold Ctrl+Space than click and drag. For “zoom in” drag to the right and for “zoom out” drag to the left.
- View Extras. Another button I never use. There are faster keyboard shortcuts for the rare occasions that I actually need extras. Or I go to the View menu (on the Menu Bar) and choose my options from there.
- Launch Mini Bridge and Launch Bridge. These buttons do exactly what they say: one launches Bridge (Bridge is an application for managing your pictures) and the other launches the Mini Bridge Extensions. Let me be honest and tell you why I almost never use these buttons. I used Bridge in the past and I can say it is a pretty solid photo management software and it works great if you have no more than 1000 pictures. But good luck managing 50000+ pictures in Bridge! It is a slow, tedious and annoying process, with huge loading times and slow reaction times. If you have a huge picture library like me then I warmly recommend Adobe Lightroom. It has most of the features of Bridge and much more. You can do some basic editing to your photos, export your gallery to the web, batch rename-edit-tag your pictures, easily modify keywords etc. But the most important aspect for me it is that it doesn’t choke on a large library of photos like Bridge does.

Menu Bar
This is where you can save any open files, set options, choose panels etc. Take a look at all the menus and try to familiarize yourself with them. Don’t be afraid to experiment and make mistakes because this is the only way you will learn. The ones you should really know about are:
- File > Save. Save your files in any of the different formats available. If you are not sure what format to choose go with .psd or .tiff.
- File > Save for Web and Devices. Save your files as .png, .jpeg or .gif.
- File > Open. Open a file.
- File > New. Create a new file.
- Edit>Keyboard Shortcuts. Change keyboard shortcuts and menus.
- Window > Workspace > Reset Workspace. If you screw your workspace this option will reset it to it’s default state. Also accessible from the “Show More Workspaces and Options” button from the Application Bar. Also note that when you open the “Window” menu you will see some little check marks next to some names. The check marks indicate what panels (or panels groups) are opened. Try it for yourself and check or uncheck panels. Lower down you will see a check mark next to “Options” and “Tools”. Uncheck “Options” to get rid of the Options bar or uncheck “Tools” to get rid of the tools panel. I never use this option because I know a keyboard shortcut for it. While in “Standard Screen Mode” press Tab to get rid of the Tools panel and the Docked Panels or press Shift+Tab to get rid of the Docked Panels only.
- Help > Photoshop Help. Don’t be shy to use help when you don’t know something. Use the search bar to find your topics. If you have a poor internet connection then you will do better if you download the help file in .pdf format to have it available all the time. Here’s the link to the .pdf file (CS5). Just let it load then save it to your computer. Also beware that due to the size of the file (40 mb) some old browsers might crash so use a modern (good) browser like Firefox or Opera.

Options Bar
This bar will look different depending on which tool you have active. Here you will find options for the active tool. For example in the image above you can see the brush options because I have selected the brush tool. We will get into more detail in future articles when we will be describing each tool from the tools panel.
Ok, so far we have reviewed the 3 upper horizontal bars. You cannot move them or resize them ( except for the little trick when we squeeze onto the same line the Application and the Menu Bar) and you can only make them disappear when choosing the “Full Screen Mode”. Also you can hide the Options Bar by choosing Window > Options ( choose again to make the Options Bar show ).
On Part 2 we will look at the 3 vertical “Bars” (Tools Panel, Image Window and Docked Panels).