In this Photoshop tutorial, we will explore an easy technique to simulate a folded paper text effect, like those we generally see in origami examples.
Final Image
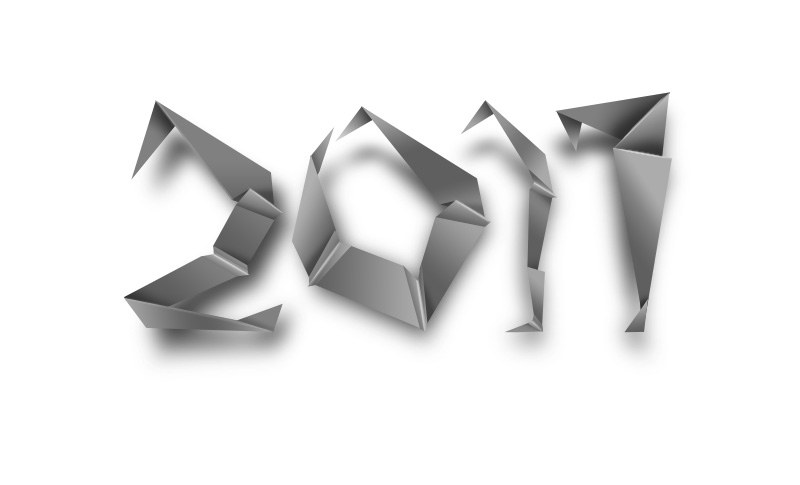
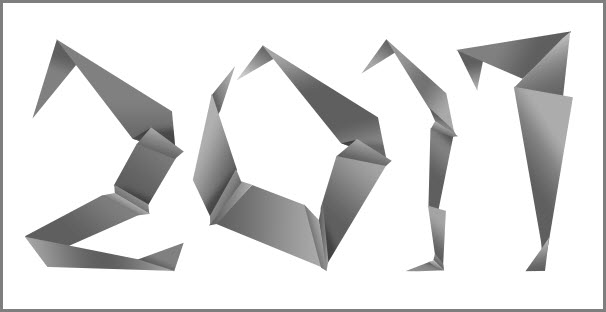
This is the final image that we’ll be creating:

Tutorial Details
- Program: Adobe Photoshop CS6
- Estimated Completion Time: 50 minutes
- Difficulty: Beginner-Intermediate
Step 1
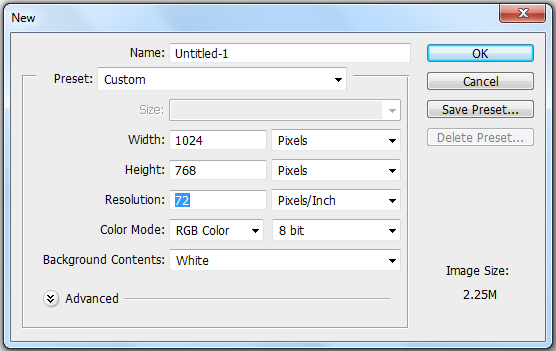
Open a new file (File > New) in Adobe Photoshop using the following settings. Save the file as “Folded Paper Text Effect.psd”. During work remember to frequently use File > Save (Ctrl + S) to save and update the file.
Step 2
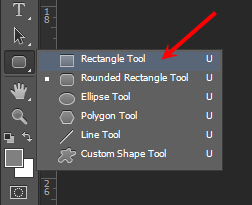
Let’s start creating the initial shapes. Then we will create the paper folds. There are many ways we can do this in Photoshop. But what we are looking for is a way which will be flexible enough for us to change or modify easily later. So we will start with the Rectangle Tool, from the Shapes Tools group.
All Shape Tools create vector shapes in Photoshop. Vector shapes are ideal for those crisp, clean lines. Also they are easy enough to modify or edit later.
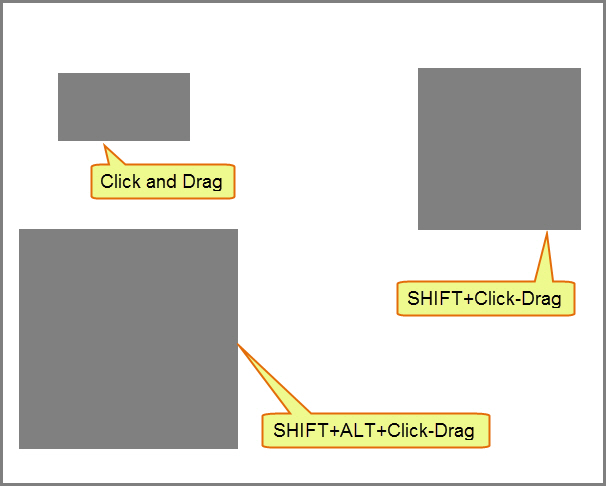
For this tutorial we will use the Rectangle Tool only. To create a rectangle, first select the Rectangle Tool and then click and drag to create a rectangle.
To create a perfect square use the SHIFT+Click and drag method. Also to create a perfect square from the center of that square use SHIFT+ALT+Click and drag method.
So now we know how to create a rectangle. But then how to do we edit it?
Use Path Selection Tool (Black arrow) and the Direct Selection Tool (White Arrow) to edit the shapes.
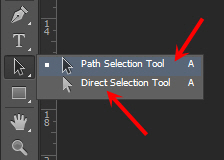
For transform, rotate and scale use the Path Selection Tool. But for editing the individual points (i.e. Anchor Points) use the Direct Selection Tool.


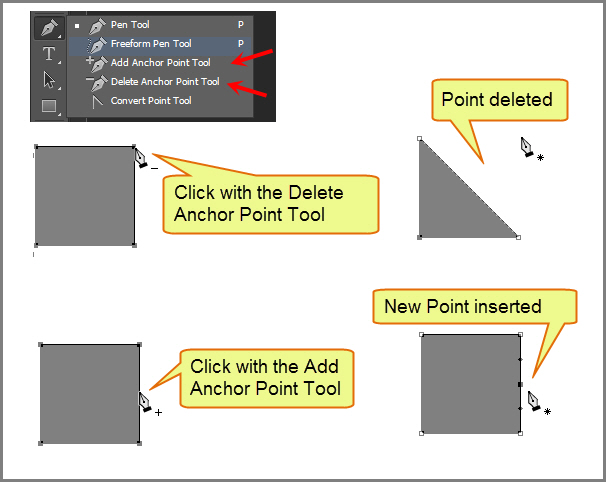
For inserting or deleting a new point use the Add Anchor Point tool or the Delete Anchor Point Tool from the Pen Tool group.
Step 3
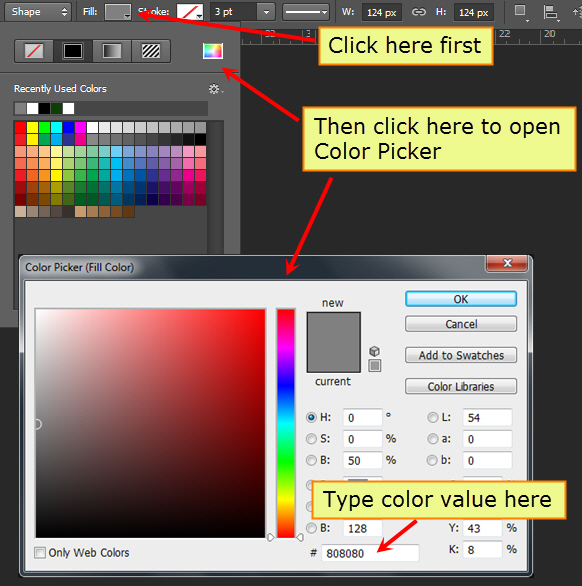
Select the Rectangle Tool from the shape Tool and change the fill color option from the Option Bar above to a Medium Gray (#808080).
Step 4
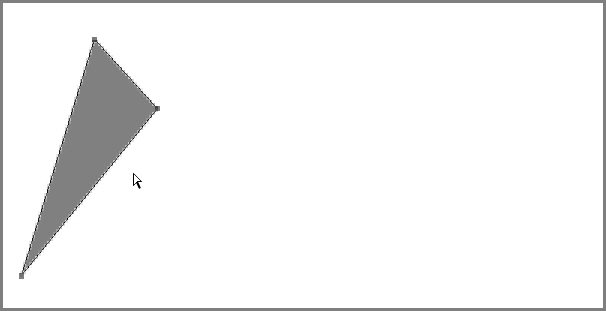
Now create a rectangle and then select the Direct Selection Tool. Move and reposition the points as shown below.
Step 5
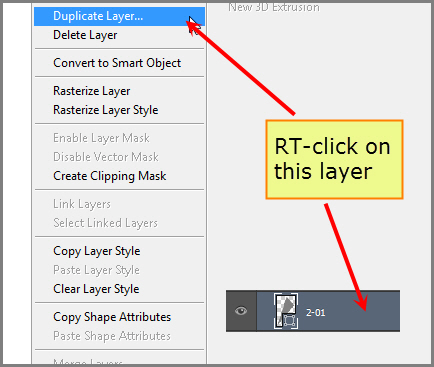
Rename the Shape layer to “2-01” by double clicking on the text. Duplicate this layer by either Right-Click on the layer in the Layer Panel or press CTRL+J.Then rename it to “2-02”.
Step 6
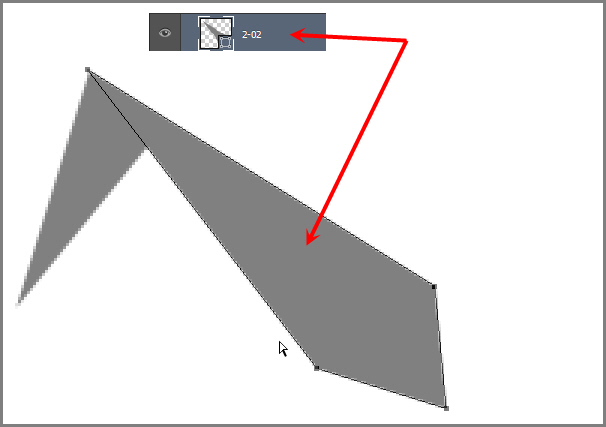
Then select the Path Selection Tool and click on the path to select the path. Then from Edit> Transform Path> Rotate or CTRL+T. Rotate the path, then select the Direct Selection Tool. Now adjust the points and position this shape by following the screenshot below:
Step 7
Follow the same steps to finish the letter “2”. Use the below screenshot as a guide.
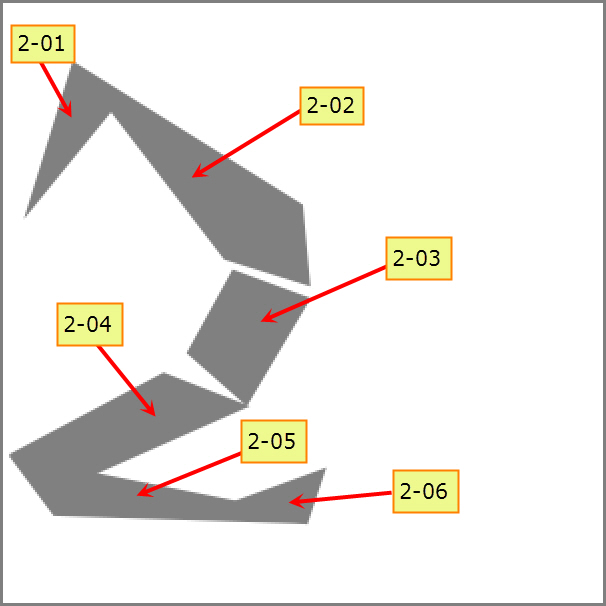
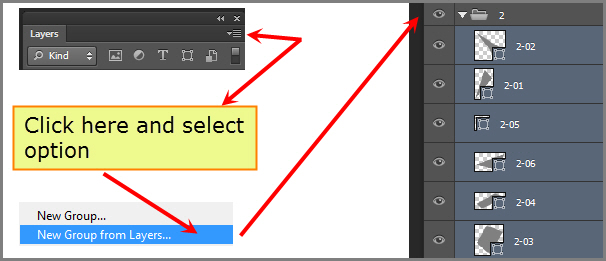
Select all these Shape Layers and create a group with the name “2”.
Step 8
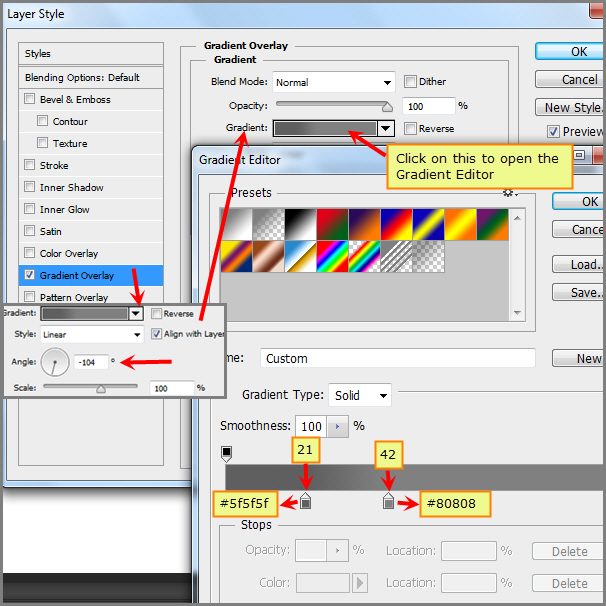
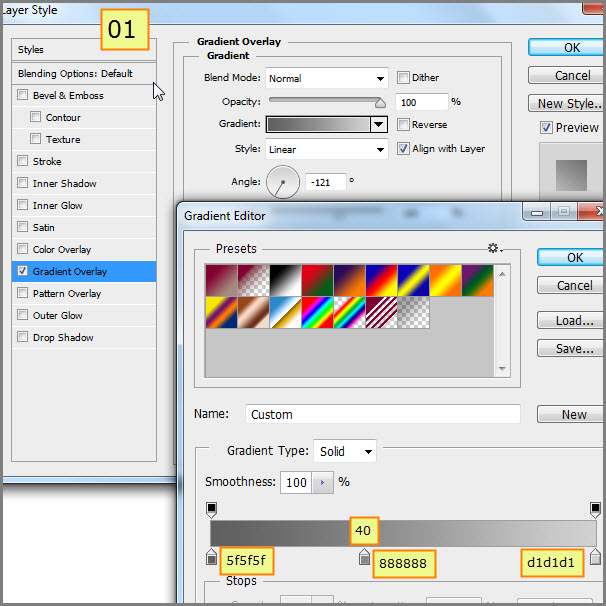
Double click on the layer “2-01” to open the layer style. You can also target the layer by clicking on it and then below the layer panel, click on the button that looks like “fx” and select Gradient Overlay. First change the angle of the gradient to -104 degrees. Then click on the Gradient Editor to create a gradient as shown below.
Step 9
Right-Click on the layer “2-01” and select Copy Layer Style.

Step 10
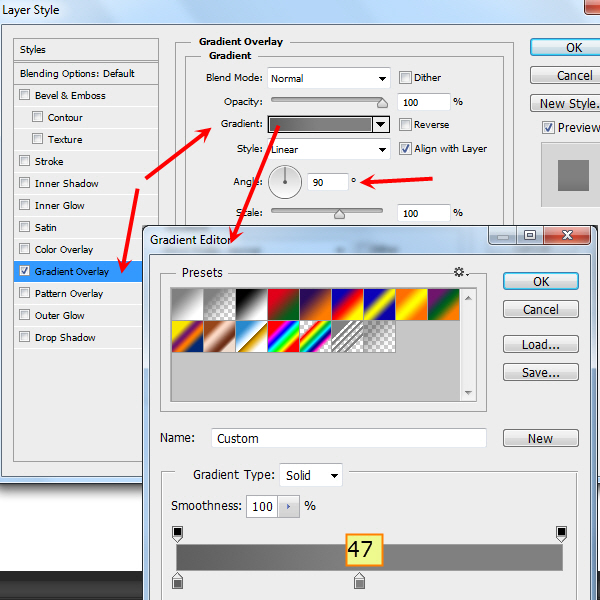
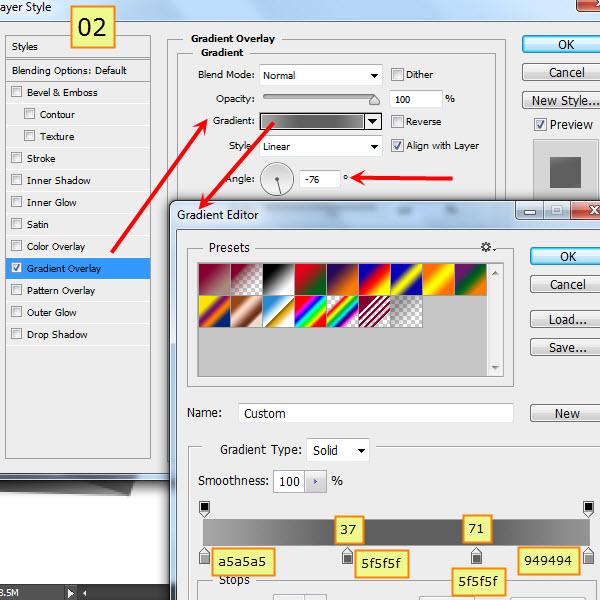
Then Right-Click on the layer “2-02” and select Paste Layer Style. Then change the angle value to 90. Then open the Gradient Editor of the Gradient Overlay and change the location of each Gradient Color Stop. No need to change the color values. Check below for details.
Step 11
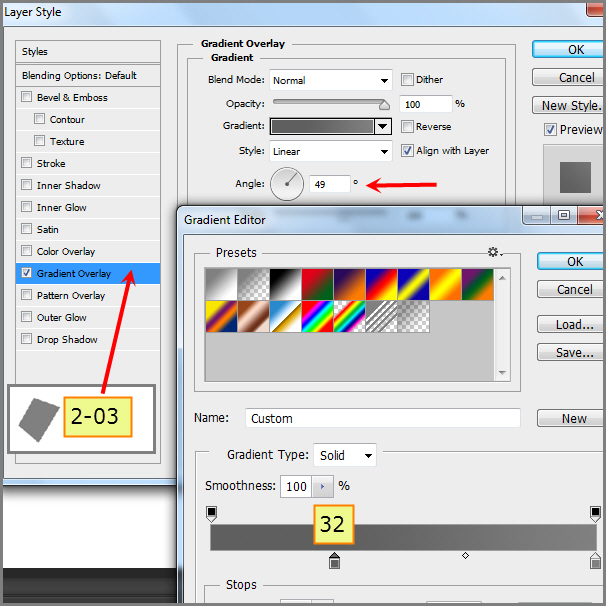
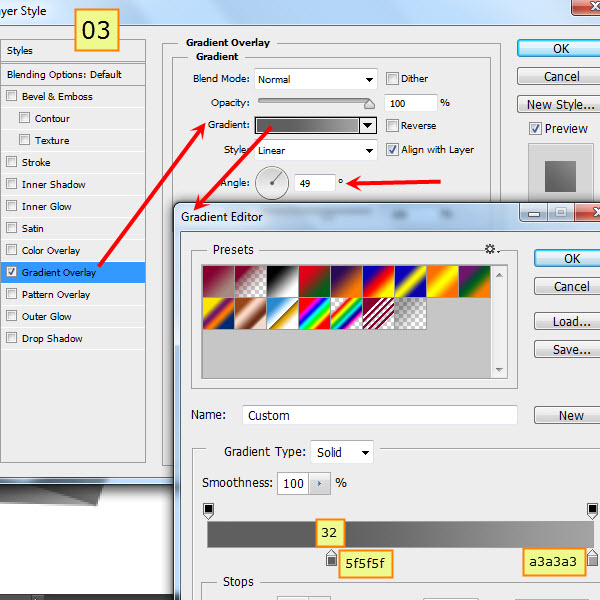
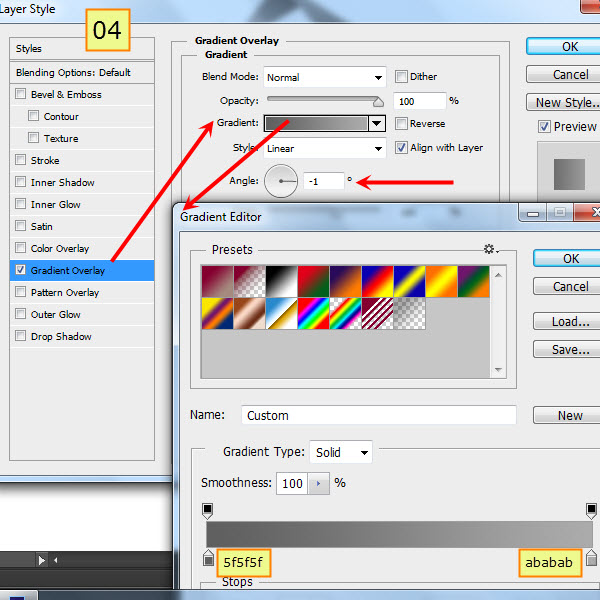
Repeat same technique for layer ‘2-03″. Here are the Gradient Overlay Settings for the layer “2-03”.Color values are the same.
Step 12
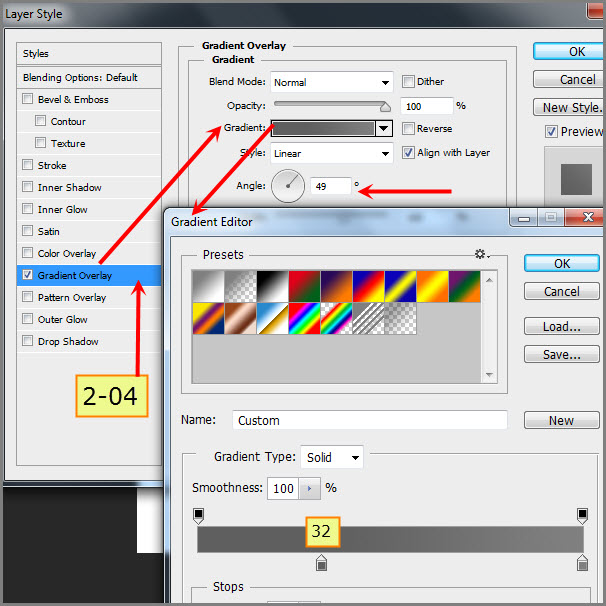
Gradient Overlay Settings for the layer “2-04”. Same color values.
Step 13
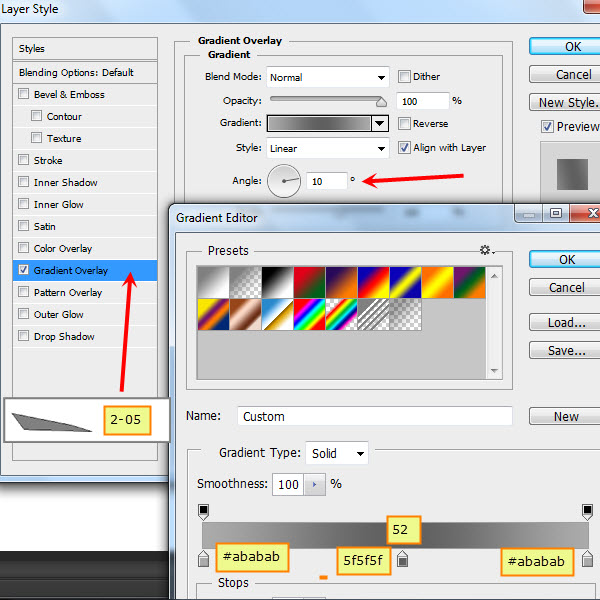
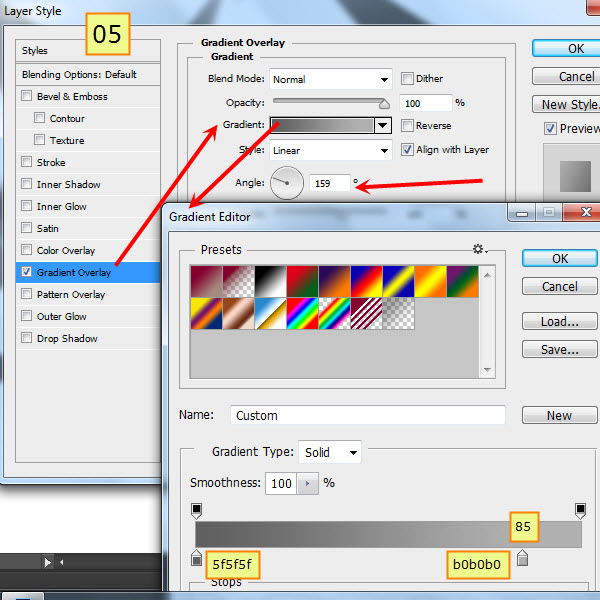
Gradient Overlay Settings for the layer “2-05”. Notice the different color values here.
Step 14
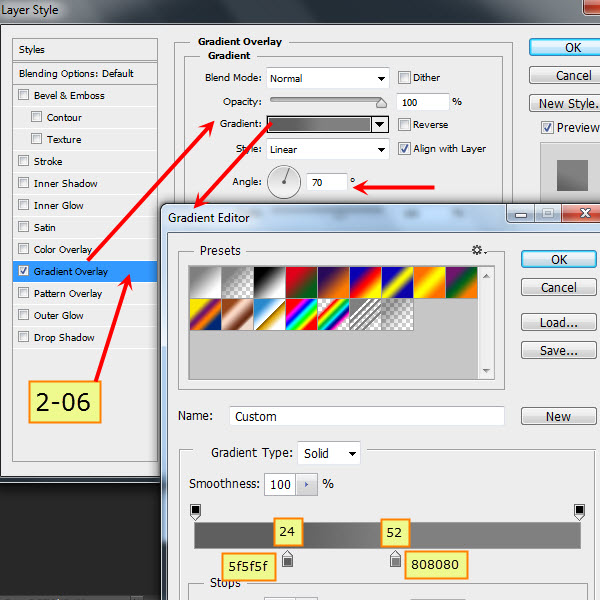
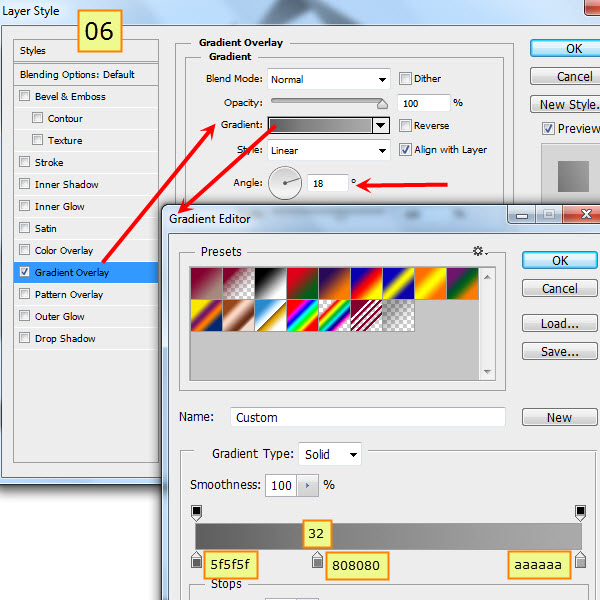
Gradient Overlay Settings for the layer “2-06”.
Completed “2” after Gradient Overlay.

Step 15
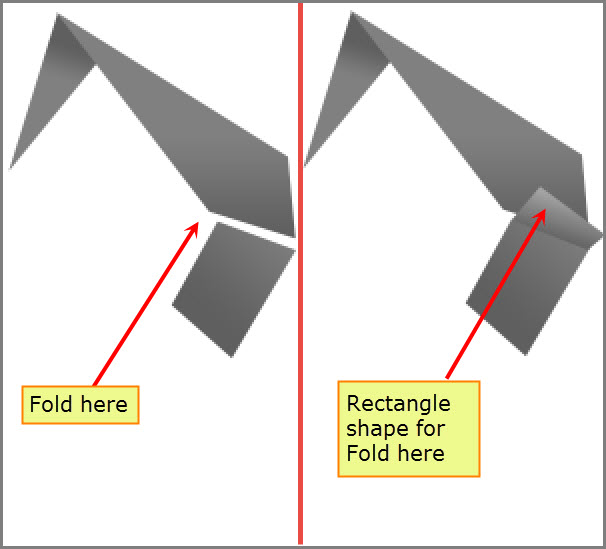
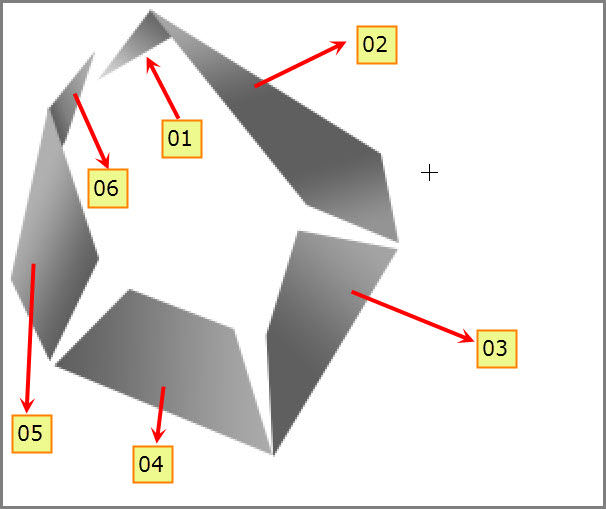
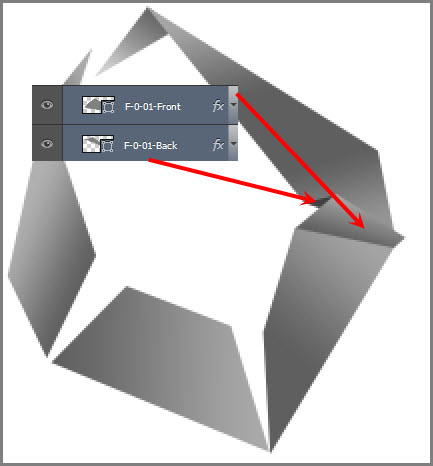
Now it’s time to create the fold shapes for “2”. Each fold will be divided into two parts. A front and a back part, where one will hide the other partially to create the simulation of a 3D fold. The technique will be same.
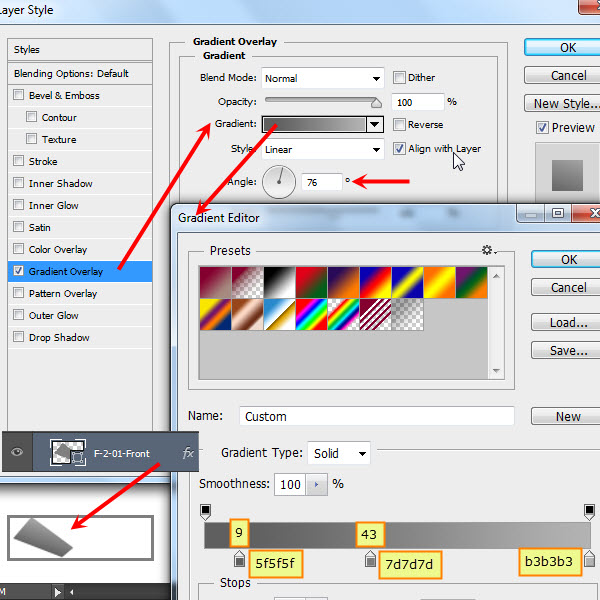
First, create a gray (#808080) colored small rectangle and edit the points with the Direct Selection Tool. Rename this layer to “F-2-01-Front”. Then create a group named “Folds” and put this layer inside this group.
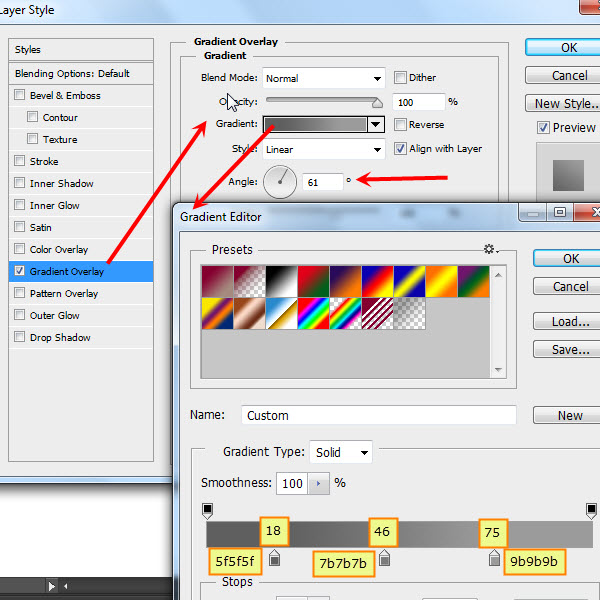
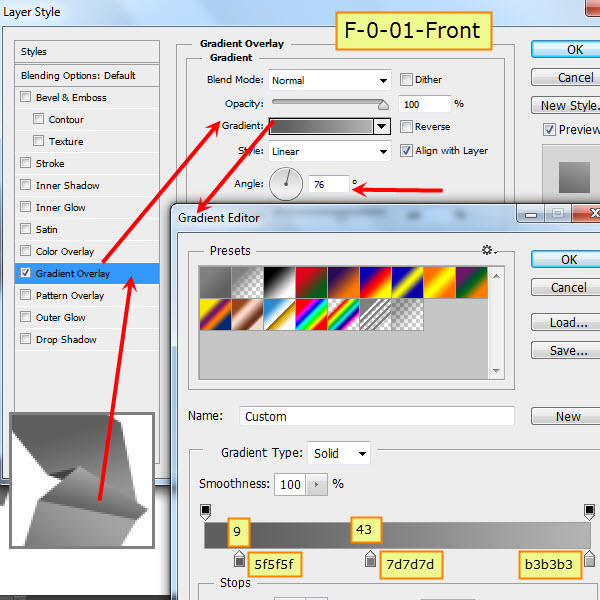
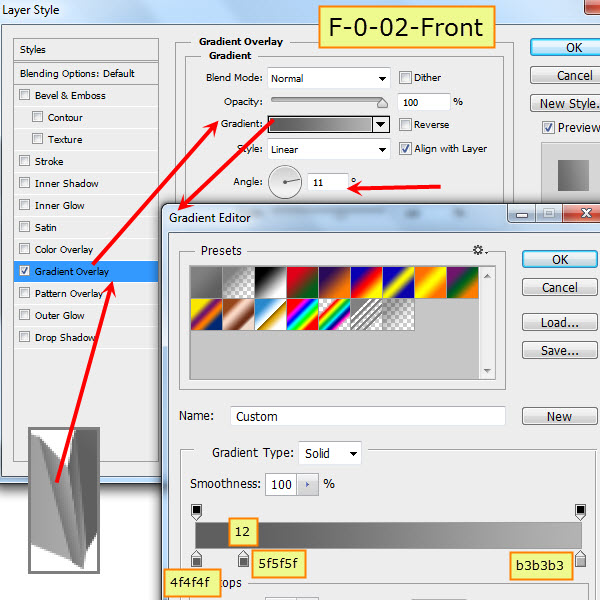
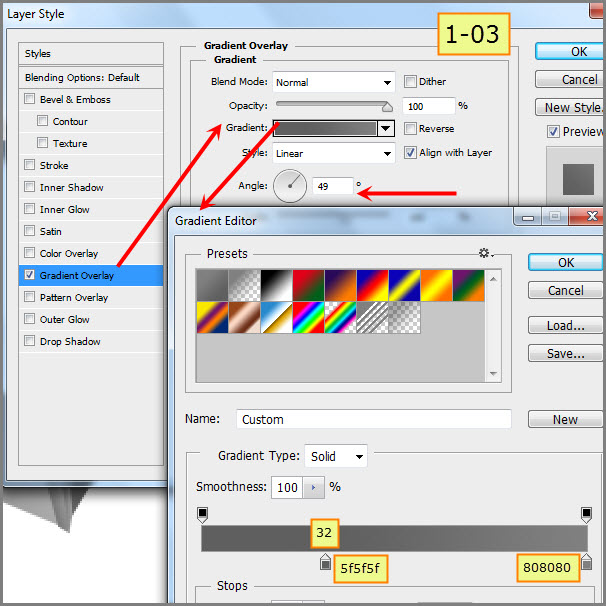
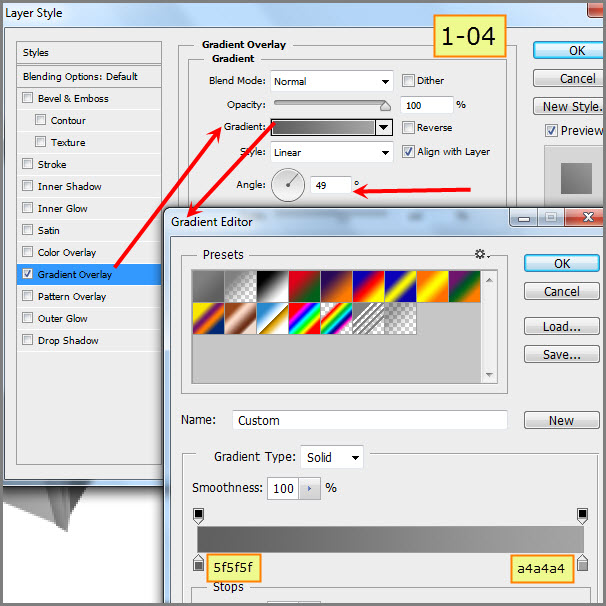
Check the screenshot below for Gradient Overlay settings for the front fold layer.
Step 16
Then duplicate this layer and drag the layer down below the previous layer. Now adjust the points to match the screen shot below.

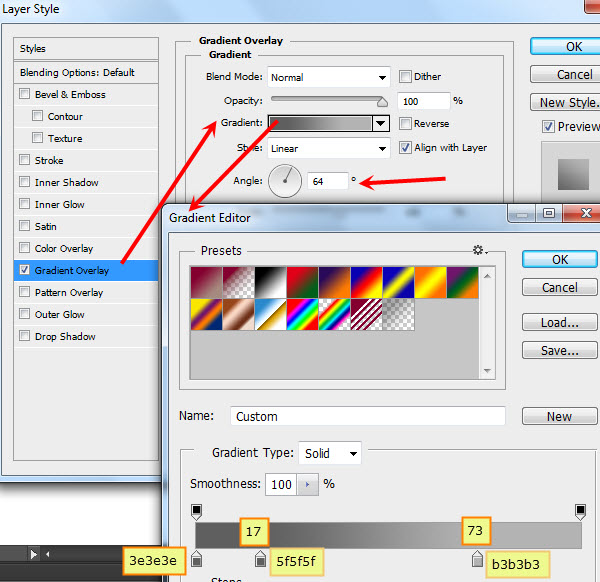
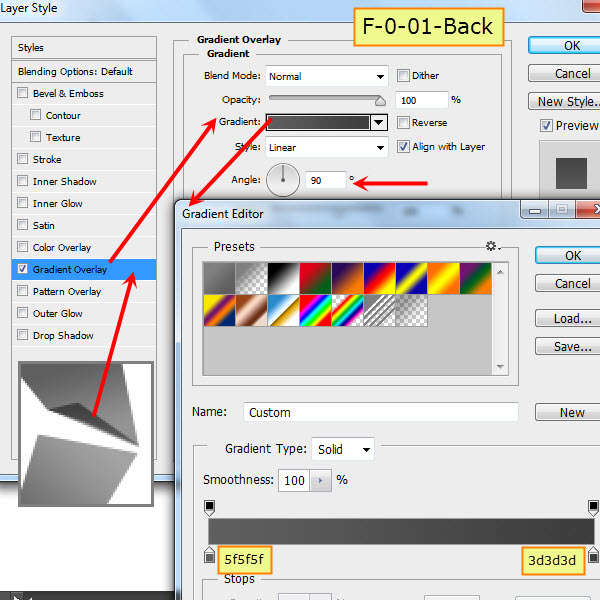
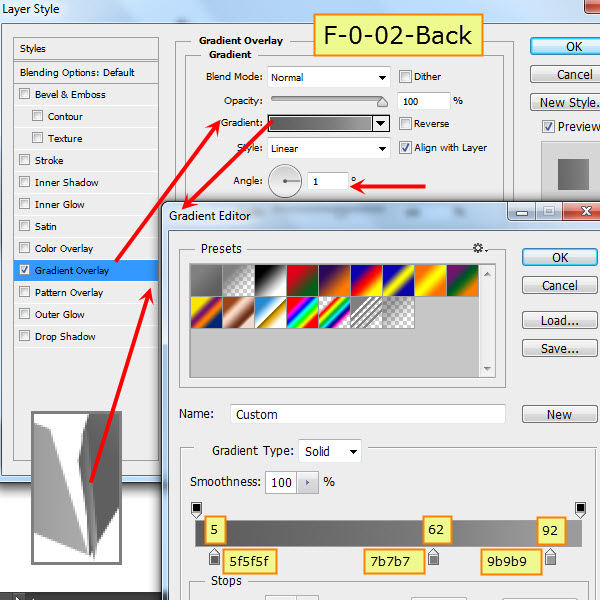
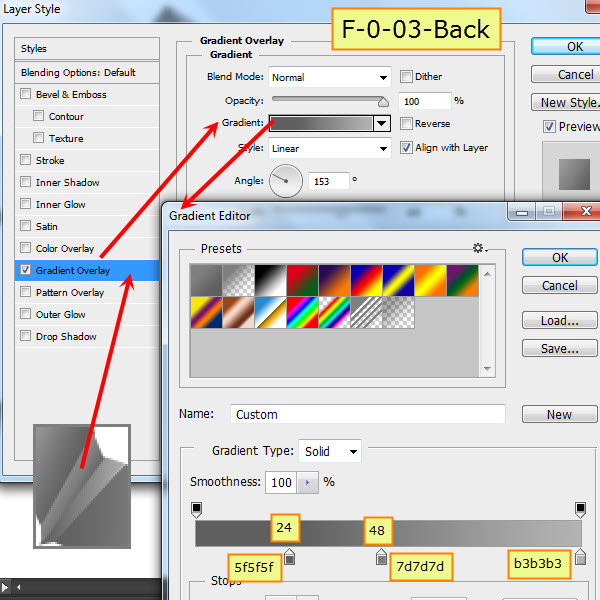
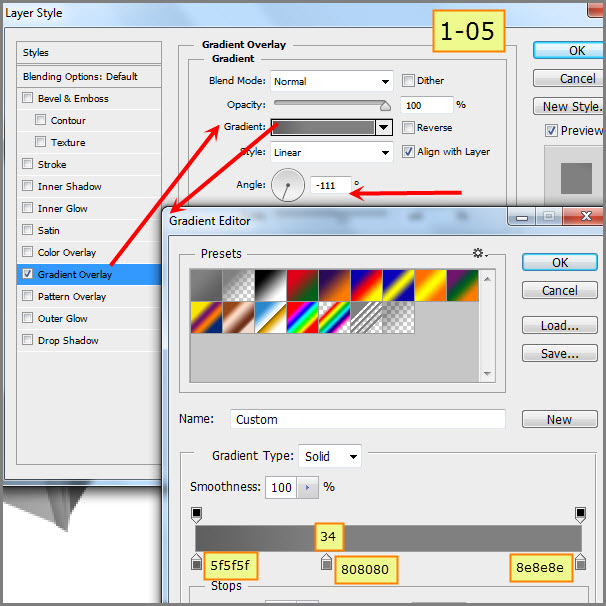
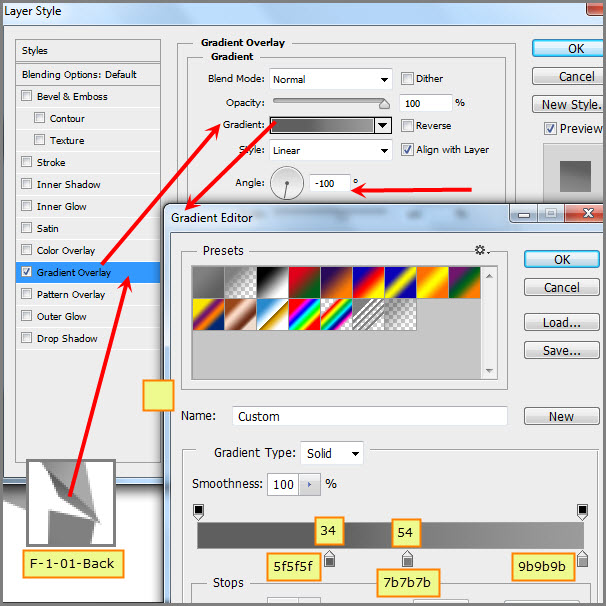
Check the screenshot below for Gradient Overlay settings of the back fold layer.

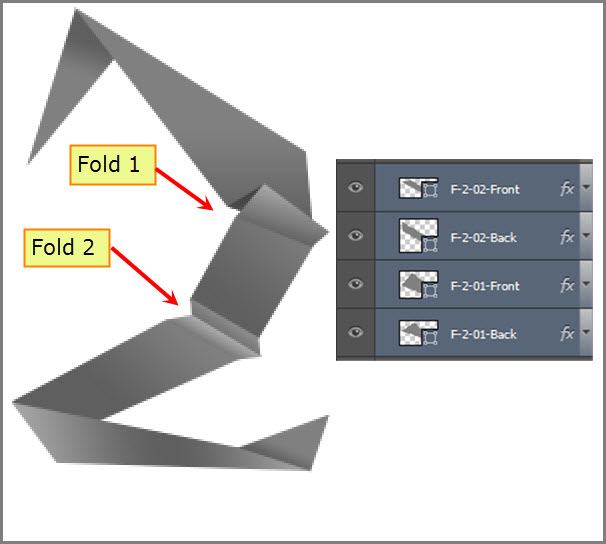
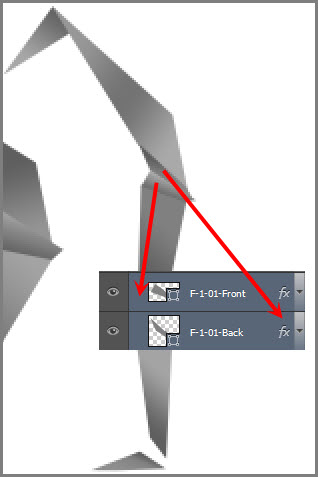
Below is the completed first fold of the shape “2”.
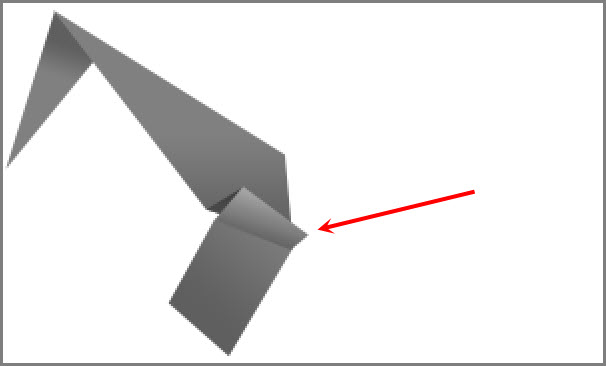
Step 17
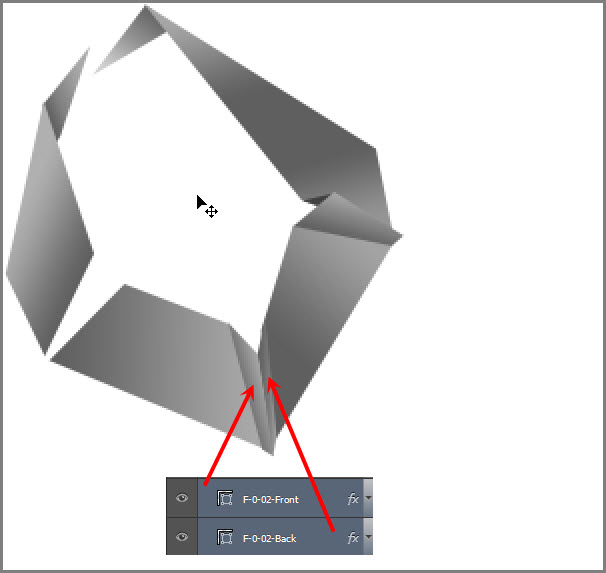
Complete the second fold for the shape”2”. Screenshots are below.

Check the screenshot below for Gradient Overlay settings.

Step 18
Below is the completed “2” with all the elements.
Step 19
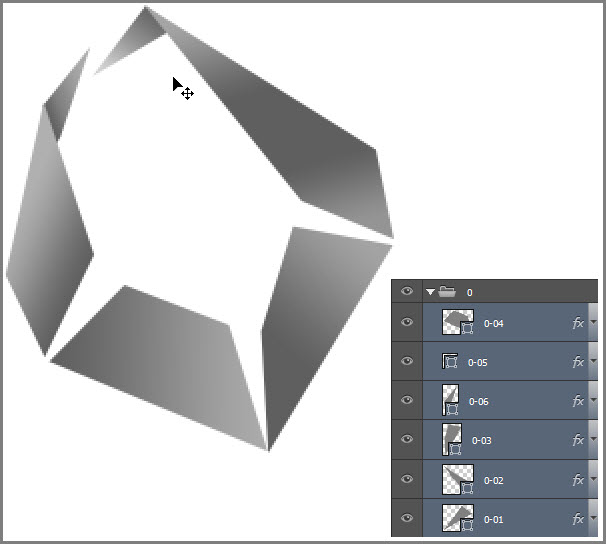
Similarly, start creating the shape “0”. Duplicate any shape layers from the shape “2” first. Then, with the Direct Selection Tool reposition the points to create the first shape element for the shape “0”. Due to duplication the layer style is still active. So edit the layer style to modify it. Then duplicate this new layer for the shape “0” and edit the points to create the second element. Then continue repeating these steps. Below is the shape “0” after completion of the Gradient Overlay styles, but before the creation of folds.
Step 20
Duplicate and rename any fold layers from the shape “2” and create a new fold for the shape “0”. Then duplicate this layer and repeat. Below are the folds for “0”.
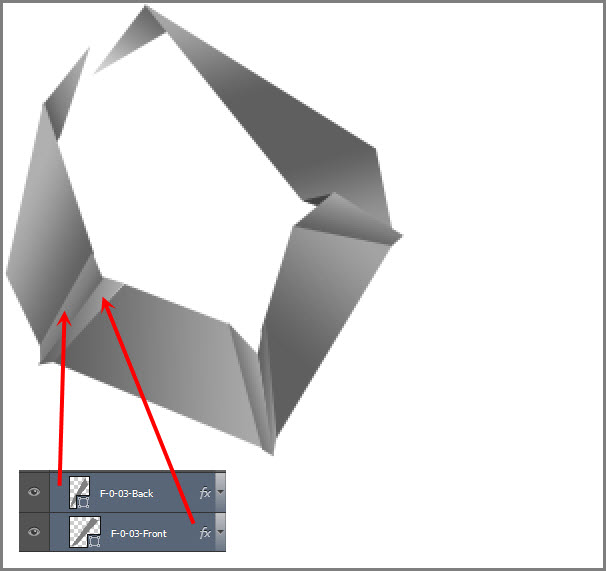
First fold of shape “0”.
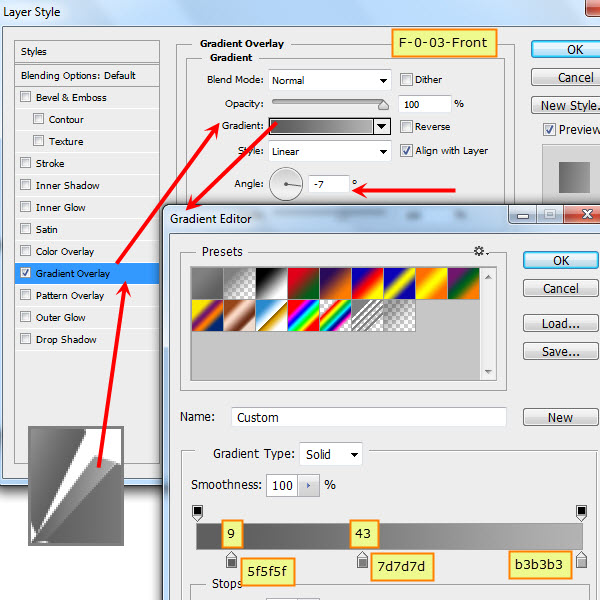
Gradient Overlay settings of first fold of “0”
Second fold of shape “0”.
Gradient Overlay settings:
Third fold of shape “0”.
Gradient Overlay settings:
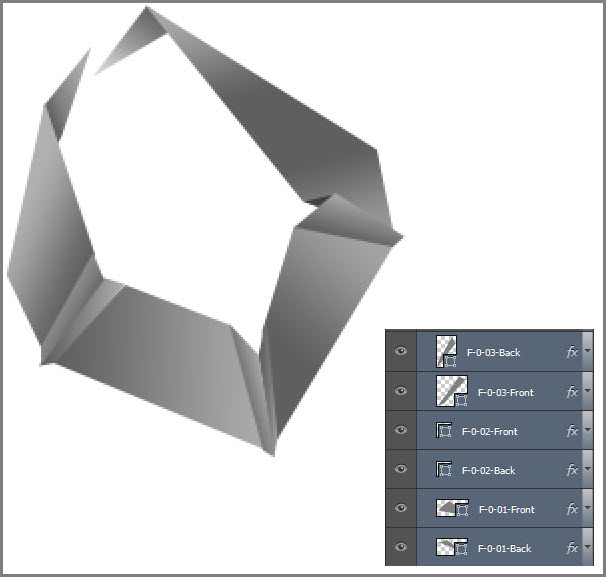
Below is the completed “0” with all the elements.
Step 21
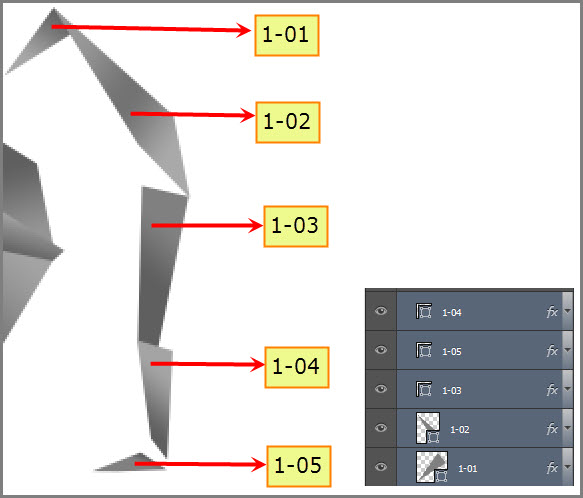
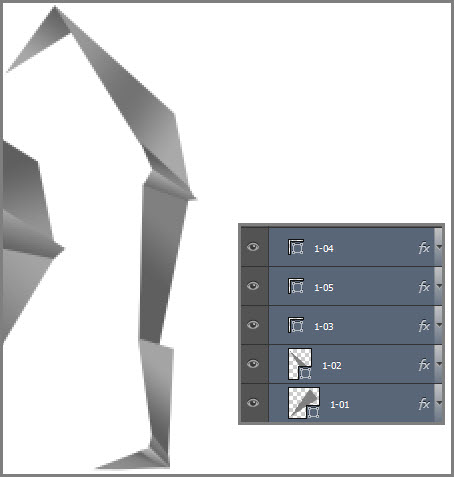
Similarly create the shape “1”. Use the screenshots below as a guide.
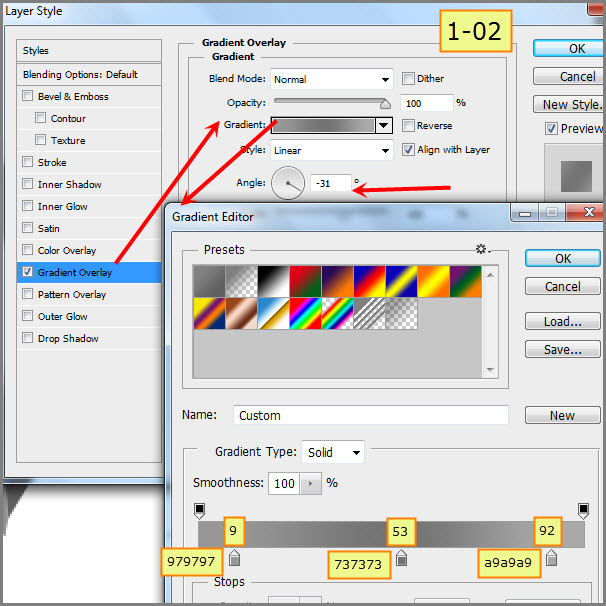
Gradient Overlay settings:

Follow the same process to create the folds for the “1” shape. For details, check the screenshots below:
First fold of shape “1”.
Gradient Overlay settings:

Second fold of shape “1”.
Gradient Overlay settings:
Below is the completed “1” with all the elements.
Step 22
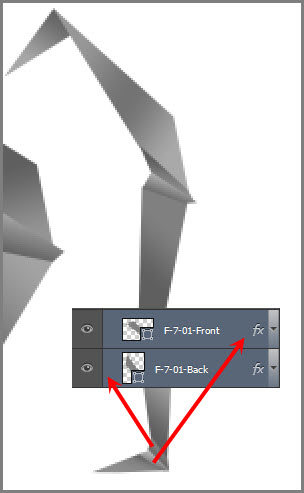
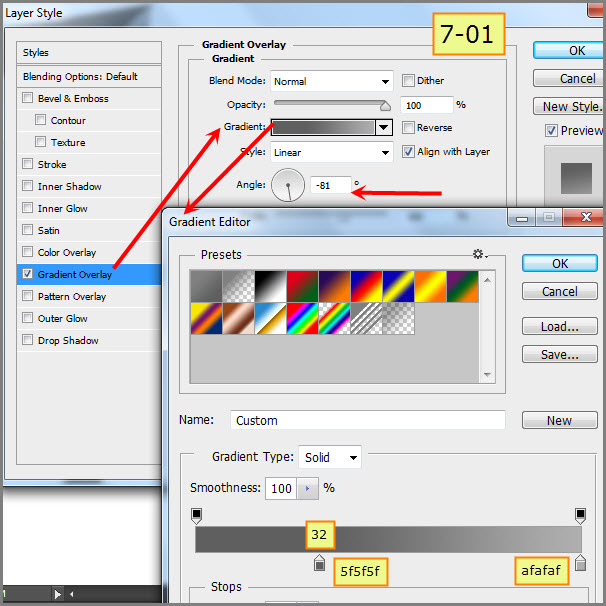
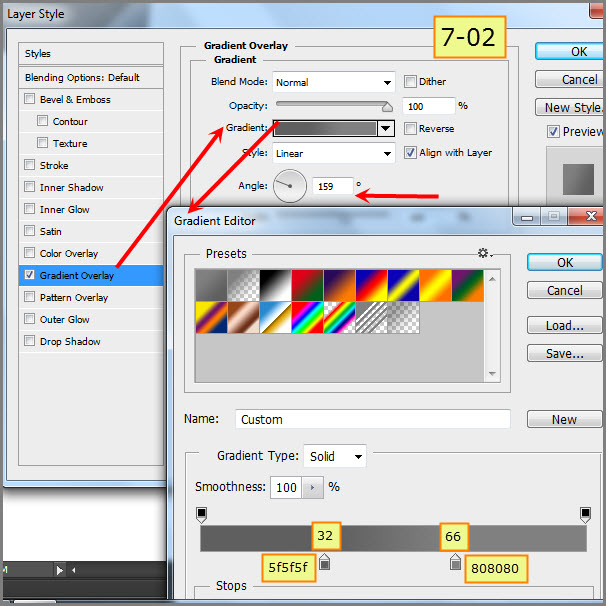
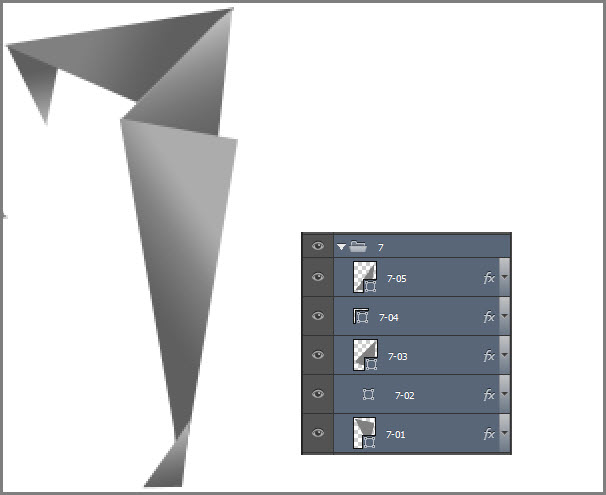
Below is the completed “7” with all the elements.
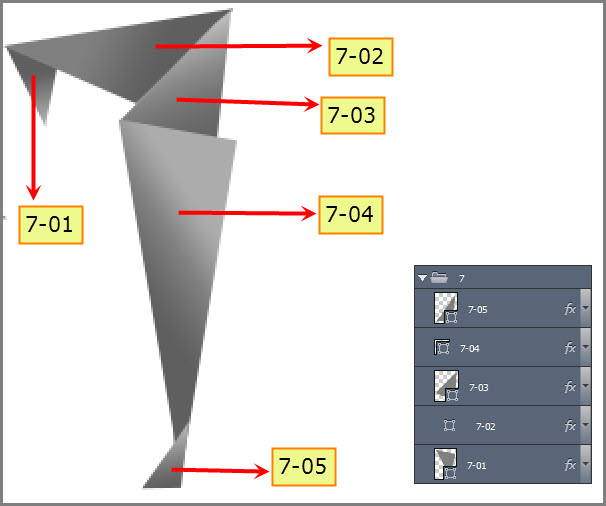
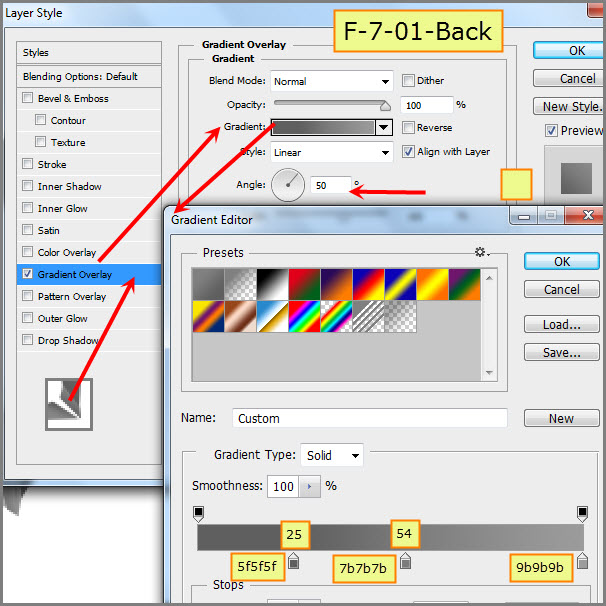
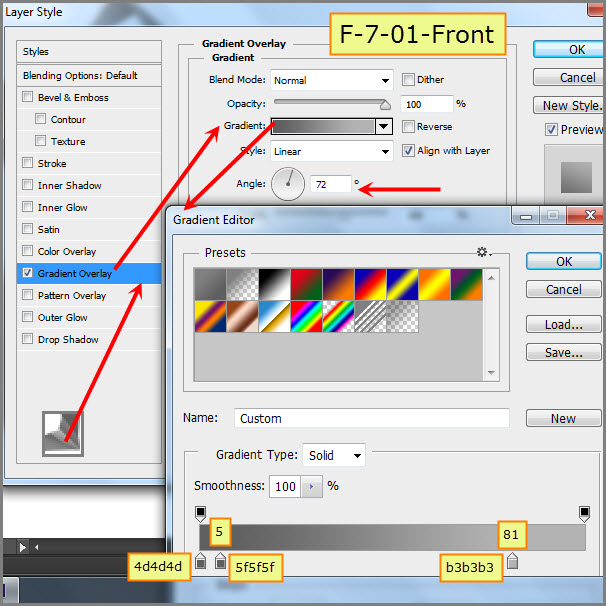
Gradient Overlay settings for all the elements for “7”.
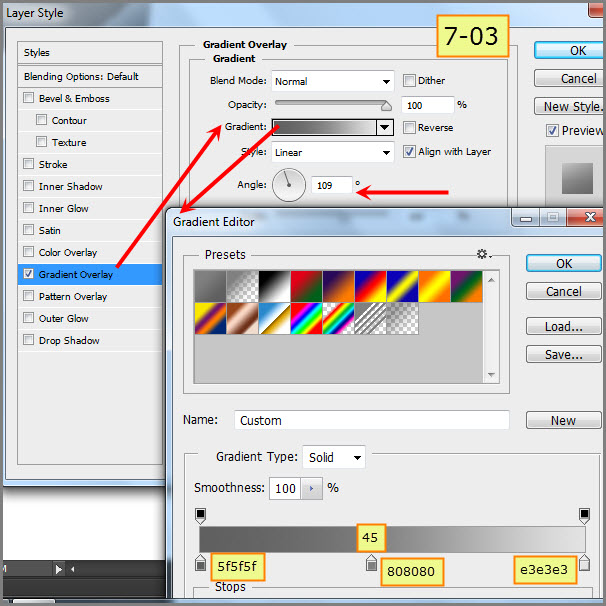
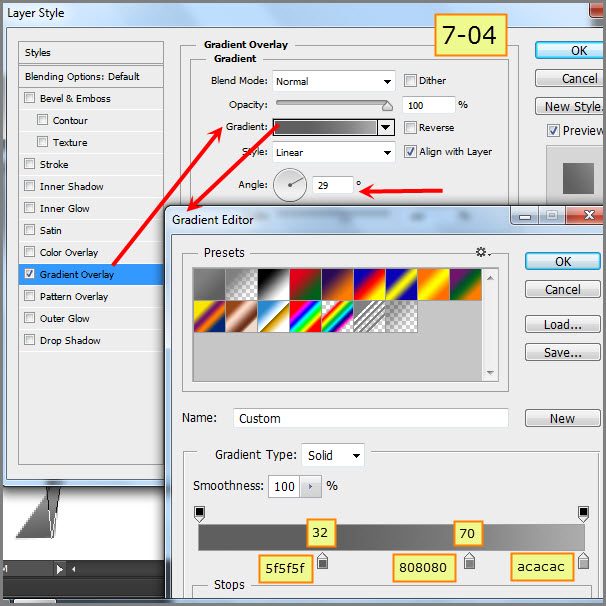
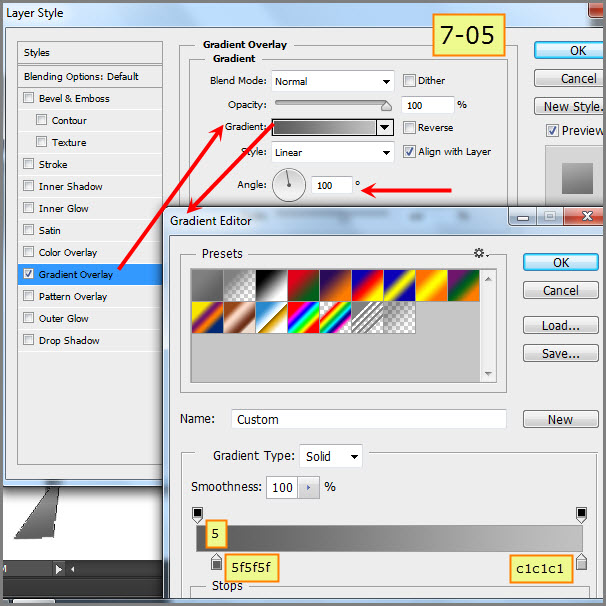
There are no folds for the shape “7”. So this will be the easiest one to make. Below is the “7” after completing.
Step 23
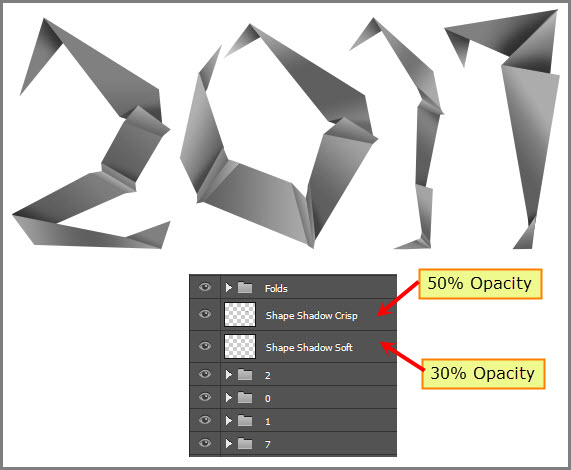
All the shapes for the folded paper text effect are now complete. So it’s time for overall adjustments and adding those small details. Let’s start with some additional shadows for all the shapes. But we will divide this additional shadow into two layers, i.e. soft and crisp.
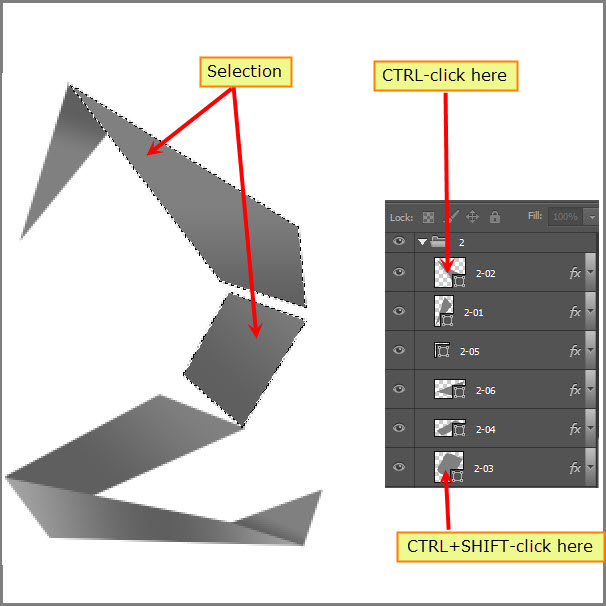
Expand the group “2” and CTRL-click on the layer “2-02” shape thumbnail to load that shape as a selection. Then press CTRL+SHIFT and click on the “2-03″ shape layer thumbnail to load that shape as a selection also. Both layer “2-02” and layer “2-03” are loaded as a combined selection.
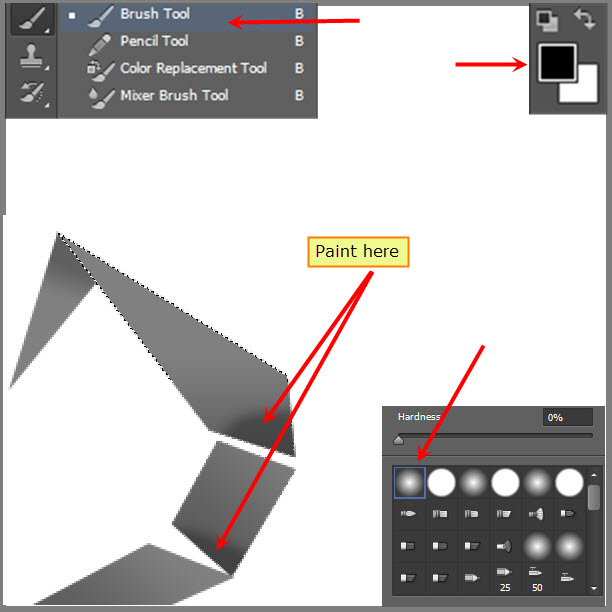
Step 24
Now create a new layer “Shape Shadow Soft” on top of it.Then select a soft brush with black color and paint on the area, which is supposed to be partially under the fold.
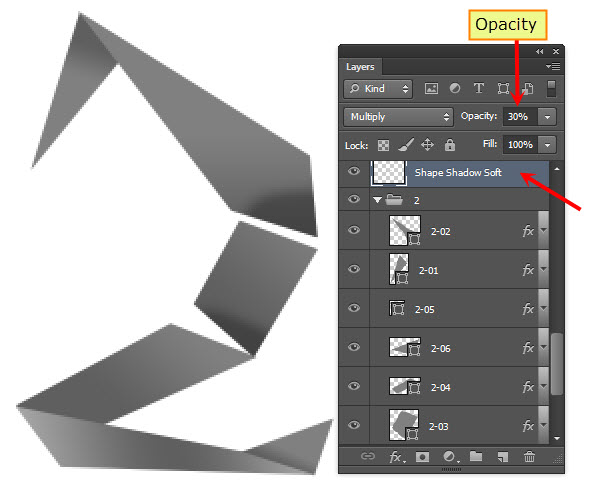
Reduce the opacity of the layer “Shape Shadow Soft” to 30%.
Step 25
Follow same process to paint more shadows on all the other shapes (0,1 and 7). Remove any unwanted shadow with the Eraser Tool.
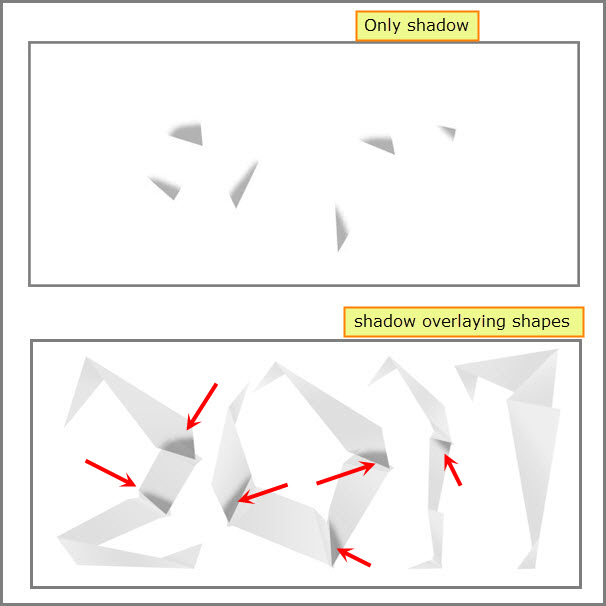
Step 26
Create a new layer on top of the layer “Shape Shadow Soft” with the name “Shape Shadow Crisp”. Follow same steps to complete creating crisp or hard shadows for all shapes.Then reduce the opacity for the layer “Shape Shadow Crisp” to 50%.
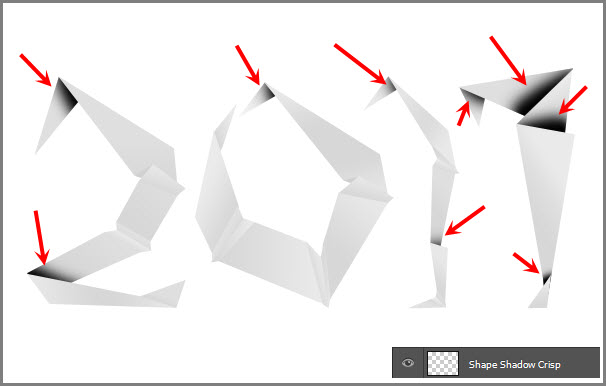
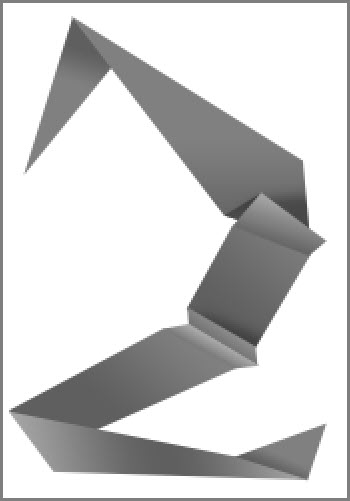
Below is the completed version.
Step 27
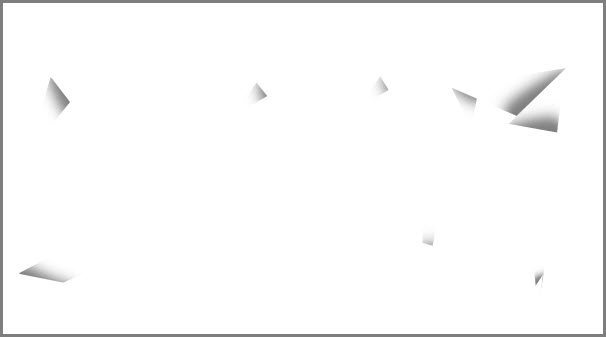
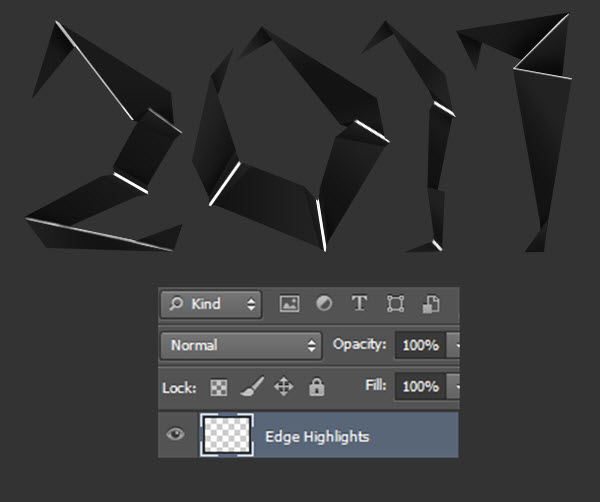
Next we will create some edge highlights like the previous shadow layers. We will divide them into two layers, i.e. soft and sharp. But these edge highlights will be only for the edges.
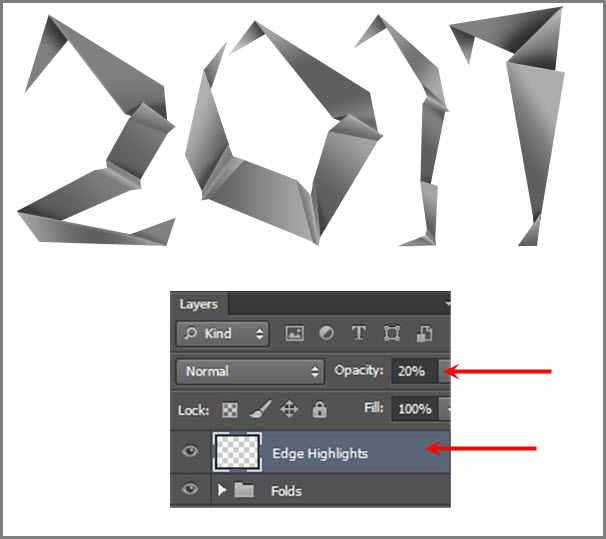
Create a new layer named “Edge Highlights” on top the “Folds” group. Select a small round brush with 75% Hardness. Then paint some edge highlights on the shapes. To do this you need to visualize the light source. Also how many edges will catch light and what will the amount of that light be. Below is the completed Edge Highlight layer. Reduce the opacity of this layer to 20% after painting.
Step 28
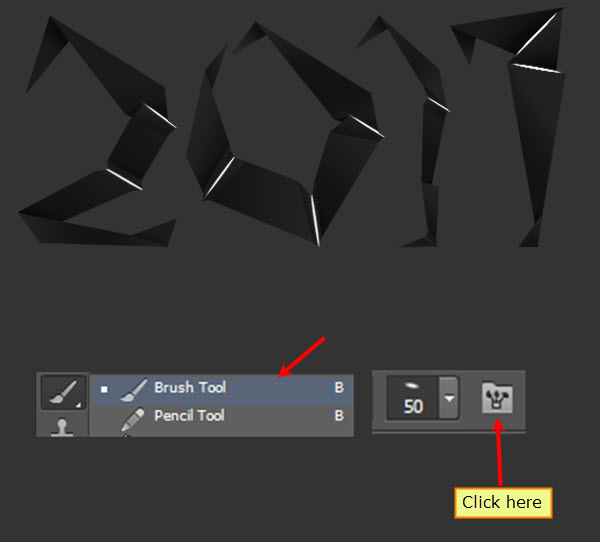
Now create a layer on top of the layer “Edge Highlights” with the name “Fold Edge Highlights”. These are the highlights on top of the folds developed due to the same light source you visualized before. This time we have to change the brush shape. We need an elliptical brush diameter for this, where the edges are tapered. Press F5 to open the Brush settings or click on the brush icon from the Option Bar. Change the brush shape based on the screenshot below.
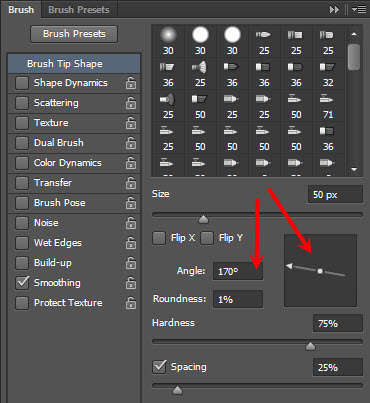
Use Left Third bracket and Right Third Bracket keys to make the brush size large or small. Now start clicking on the fold edges to create the edge highlights. Use the Angle option from the Brush settings to align the brush to the edge, where you are painting. Reduce the opacity of the layer “Fold Edge Highlights” to 40%. Below is the completed “Fold Edge Highlights” layer.

Step 29
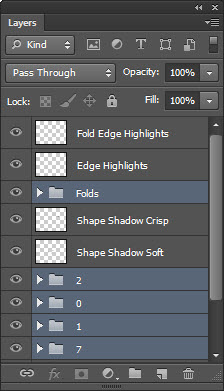
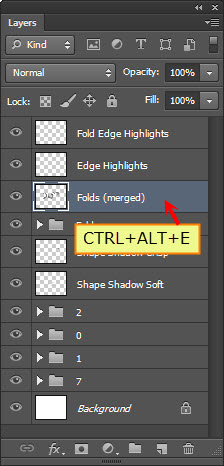
We are almost there. All that is left to add is a final shadow layer below the 2017 groups. First CTRL-click to select following layers. We use CTRL-click for custom selection or selective selection. Then press CTRL+ALT+E to create a new layer and paste a “merged” version of the selected layer on it. Use the screenshot below as a guide.
Step 30
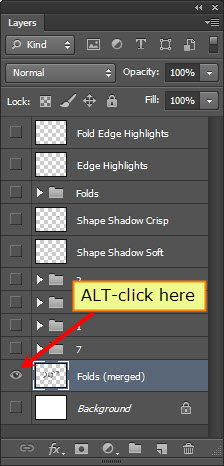
Drag this “Folds (merged)” layer down below and position on top of the “Background” layer. Then ALT+Click on the eye icon at left to turn off all other layer visibility besides this one.

Step 31
Open level command from Image> Adjustments> Levels. Drag the right Output Level slider towards the left side to darken the “Folds (merged)” layer.

Step 32
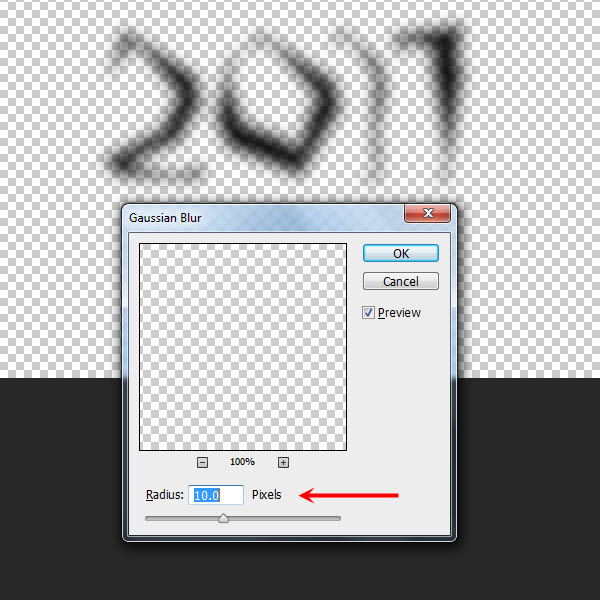
Filter> Blur> Gaussian Blur and apply a radius of 10 pixels.
Step 33
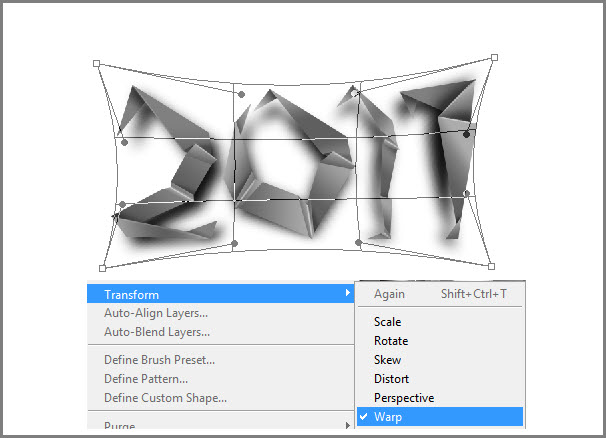
Now Edit> Transform> Wrap. Then drag the handles to distort the shadow. This will give a more non uniform perspective shadow, which generally we see below folded or crumpled paper.
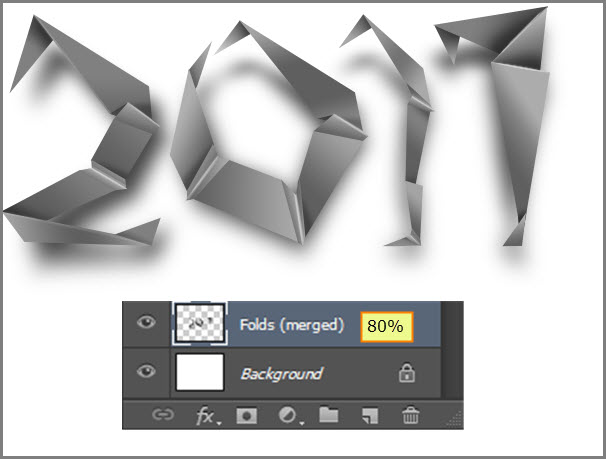
Reduce the opacity of this layer to 80%.
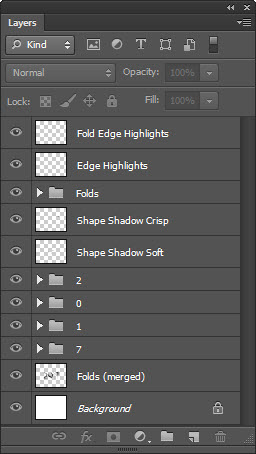
Final Layer arrangements.
And We’re Done!
Congratulations! You have successfully completed the Folded Paper Text Effect in Photoshop. But you can still continue working by adding more highlight or shadow details. Use the comments section below to share your final result with us. Below is my final result.