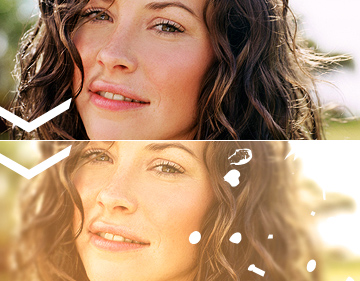
In this quick Photoshop tutorial I’ll teach you how to make a nice, warm, summer photo manipulation for a photo. This tutorial best works for fairly colorful, fairly bright photos. In this tutorial I will be using this stock photo of the lovely Evangeline Lilly.
1.
Firstly, you should find a nice stock photo to work with. As I mentioned above, I used a nice photo of Evangeline Lilly, if you want you can download it and get to work. Start by flipping the image so it’s around the right way, then crop and resize if necessary. I ended up with a document size of 360 x 450 pixels.
2.
Duplicate the Background layer then apply Filter > Sharpen > Sharpen once, then fade it to about 50% (Edit > Fade). This will bring out the details a little bit.

Next, using the Blur Tool, blur the edges (her hair) a little bit, if it’s too strong you can change the strength of the Blur Tool. This just focuses on her face a little bit more.
3.
Again, apply Filter > Sharpen > Sharpen and fade it to about 15-30%, remember, this stuff is optional. Next thing to do is get the Gradient Tool and set the following settings:
![]()
The colors I’m using are #b66d39 and #42352f. On a new layer, draw your gradien on the canvas, starting with the lighter color in the bottom left and the darker color at the top right.

Change the layer mode for your gradient layer to Screen and lower the opacity to about 95%.

You will be left with a nice, warm result like this:
Beautiful!
4.
Now to add a few color adjustments. Start by making a Brightness/Contrast layer by going to Layer > New Adjustment Layer > Brightness/Contrast… with similar settings to these:
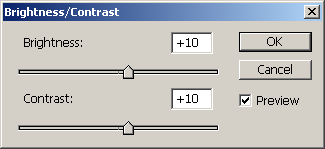
This just brightened it up a little bit.

Lastly, I added a Photo Filter (Layer > New Adjustment Layer > Photo Filter…,) these are only available in Photoshop CS2 and up.
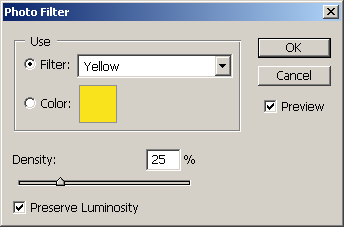
This just added in a little bit more yellow, I’m not sure if I’m too fond of it actually.
5.
Lastly, I added a border around the photo, and a few plain white shapes to the right side of the photo. These shapes come with Photoshop, you can find them by getting the Custom Shape Tool and selecting All when in the shapes category.

That’s all for this tutorial! Sorry, but I hope you enjoyed the tutorial!

