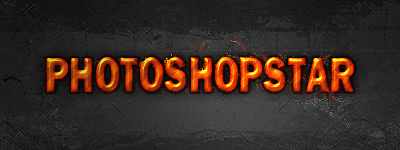
In this nice and easy tutorial I’m going to be teaching you how to make a metallic, industrial-style text effect, using layer styles mainly, but also filters to make nice after-effects. You can see my outcome from this tutorial in the below image.
1. Creating a Suiting Background
You’ll want to start off by making a new document, then creating a canvas/background that suits the theme we’re working with (industrial, grunge.) So, I came up with this dark background by using some free downloaded grunge brushes:

After doing a little bit of random grunge brushing on the canvas, I flattened the image, duplicated the background layer and messed with a few filters. Some good ones are Filter > Brush Strokes > Crosshatch and Filter > Render > Lighting Effects. You can mess with a lot of these filters to get some really amazing outcomes though, the brush strokes are especially good if you want a grungy kind of background. Remember to duplicate layers and mess with the layer modes and opacities.
So, now you’ve created a nice background, you’ll want to move onto the next step and create some text!
2. Creating Your Text
Start by getting out the Horizontal Type Tool (just the normal type tool), now write out whatever text you want to. I used the name of my website, “PhotoshopStar”, using the color #e56916.

The font I’ve used in the above image is called Frankfurt Heavy, but I’m not sure if it’s a free or commercial font, so you’ll need to find a nice font for the job. A few fonts I can recommend are Arial Bold and Impact, which should both come with Windows. You can also find a few good font resources below.
Now, after you’ve written out your text and you’re happy with it, move onto the next step and apply some layer styles.
3. Adding Effect to Text
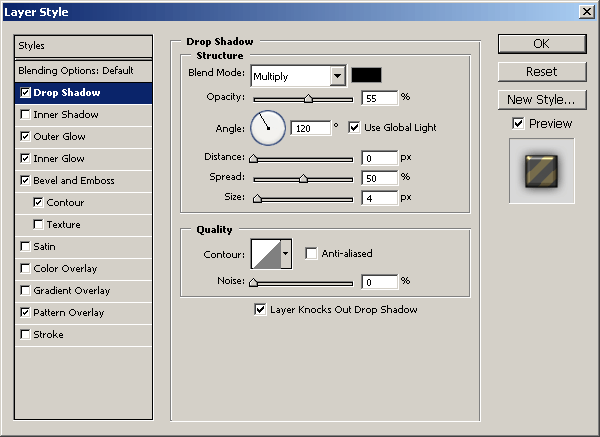
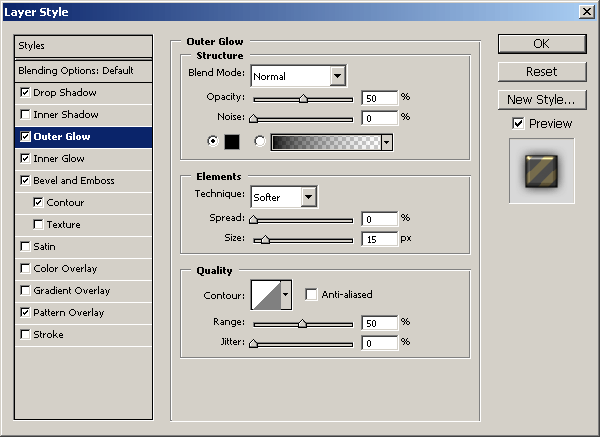
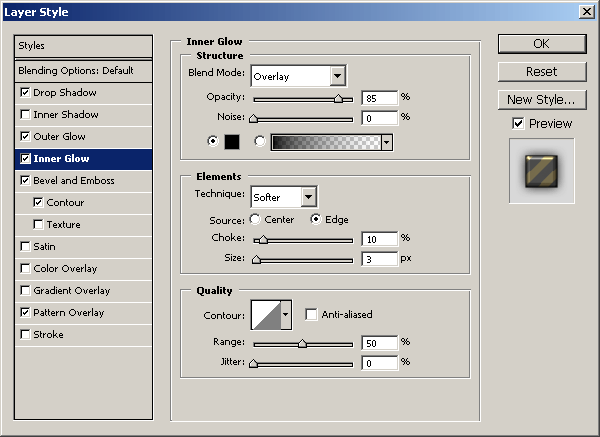
Now it’s time to add some effect to your text by applying layer styles. Start by right-clicking your text layer in the layer’s palette, then go into the Blending Options. Click and apply the following layer styles/settings:
- Drop Shadow
- Outer Glow
- Inner Glow
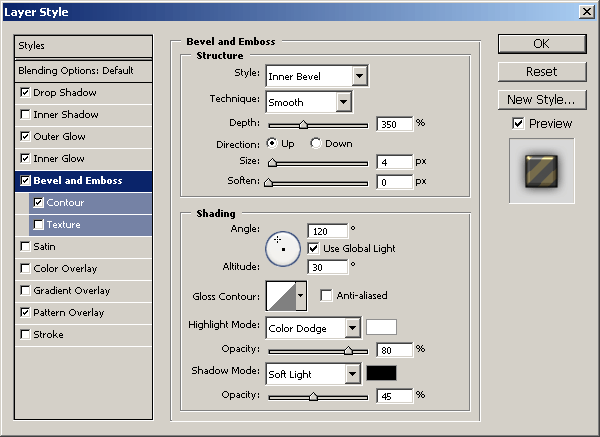
- Bevel and Emboss
- Bevel and Emboss – Contour
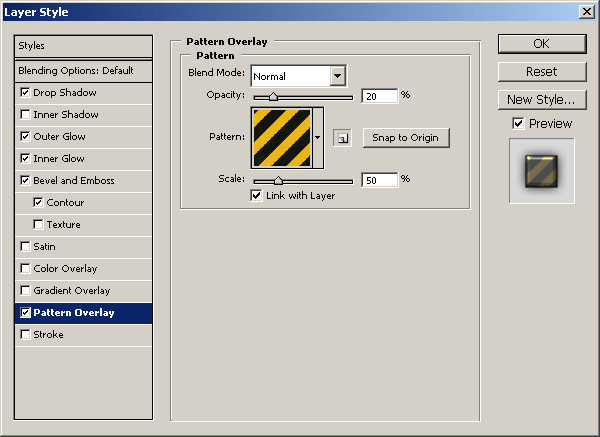
- Pattern Overlay
(you’ll want to download this warning tape pattern, then turn it into a pattern)
Now, after you’ve applied all of those layer styles, you should have an effect something like this:

Not bad, but still needs some spicing up. You could do some spicing up by making another text layer maybe, or applying some filter effects. I spiced it up a little bit by firstly duplicated the text layer, then merging it with a blank layer, this is to merge the layer styles in with the layer. I then applied Filter > Distort > Displace using a random PSD file I had laying around. After doing this, you’ll want to mess with layer modes and opacities, you may also want to erase some of the duplicated layer.

Not bad, but you’ll need to get creative and mess around with different things if you want to come up with something nicer! Remember to try some Filters on the final image to give it some extra oomph!
Anyway, thanks very much for reading this tutorial, I hope you enjoyed it! Come back soon.