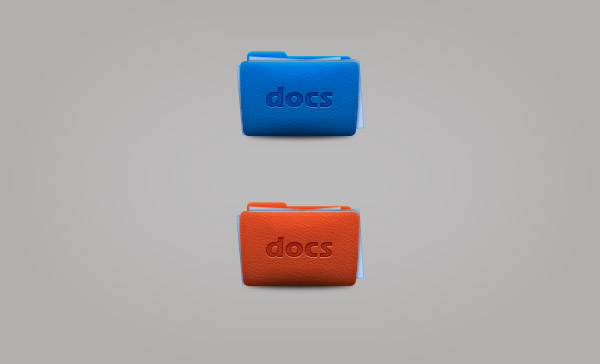
In the following tutorial you will learn how to create a simple documents icon in Adobe Photoshop.
Final Image
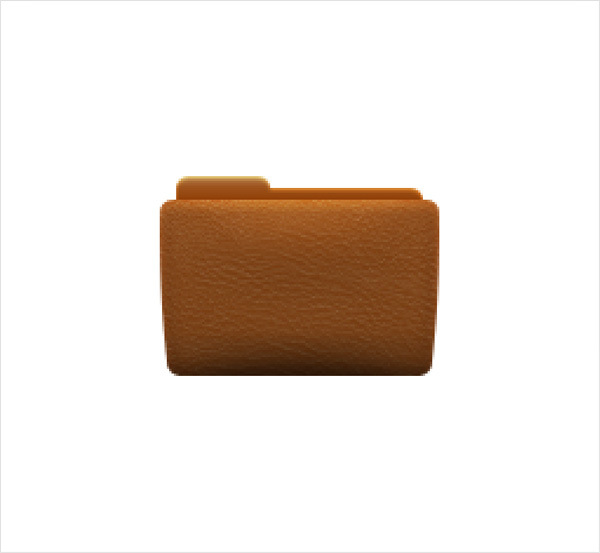
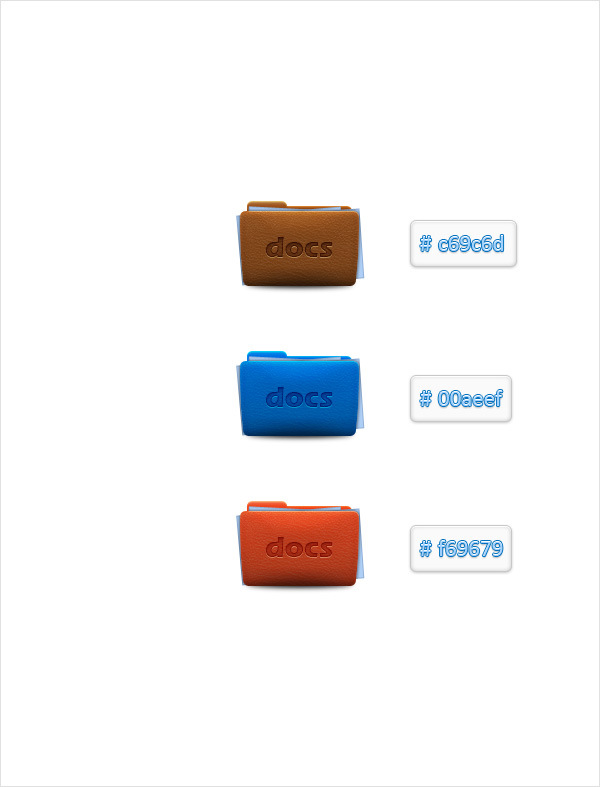
As always, this is the final image that we’ll be creating:
Tutorial Details
- Program: Adobe Illustrator CS5
- Estimated Completion Time: 45 minutes
- Difficulty: Beginner-Intermediate
Resources
Step 1
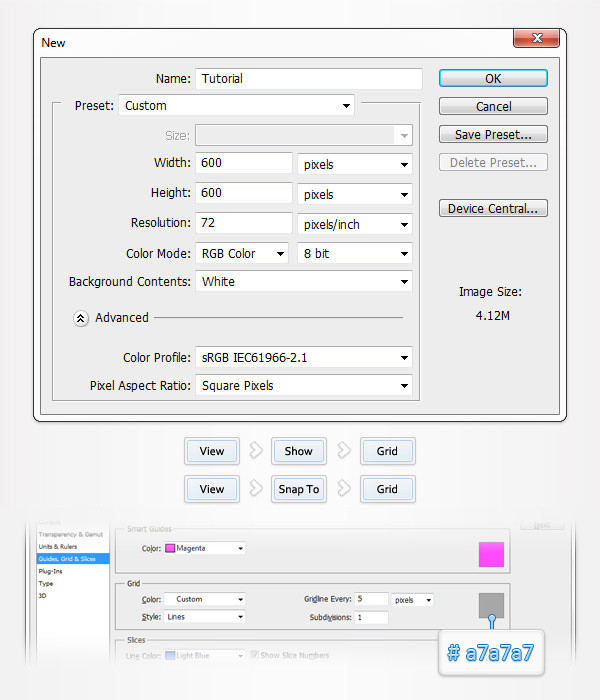
Open Photoshop and hit Control + N to create a new document. Enter all the data shown in the following image and click OK. Enable the Grid (View > Show > Grid) and the Snap to Grid (View > Snap To > Grid). For starters you will need a grid every 5px, so simply go to Edit > Preferences > Guides, Grid & Slices and focus on the Grid section. Enter 5 in the Gridline Every box and 1 in the Subdivision box. Also, set the color of the grid to #a7a7a7.
Once you have set all these properties click OK. Don’t get discouraged by all that grid. It will ease your work later and you can easily turn it on/off using the CTRL + ‘ shortcut. You should also open the Info panel (Window > Info) for a live preview with the size and position of your shapes.
Step 2
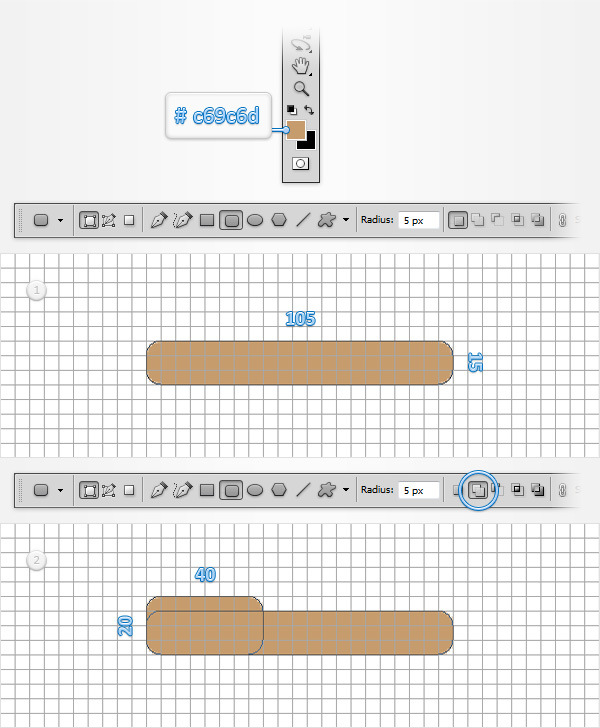
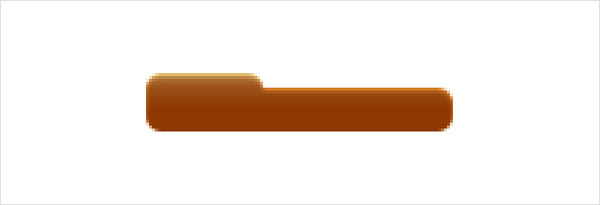
Set the foreground color at #c69c6d and pick the Rounded Rectangle Tool. Focus on the top bar, set the radius at 5px and create a 105 x 15px vector shape. Make sure that this new shape stays selected and get back to the top bar. Check the Add button then simply add a 40 x 20px rounded rectangle and place it as shown in the second image.
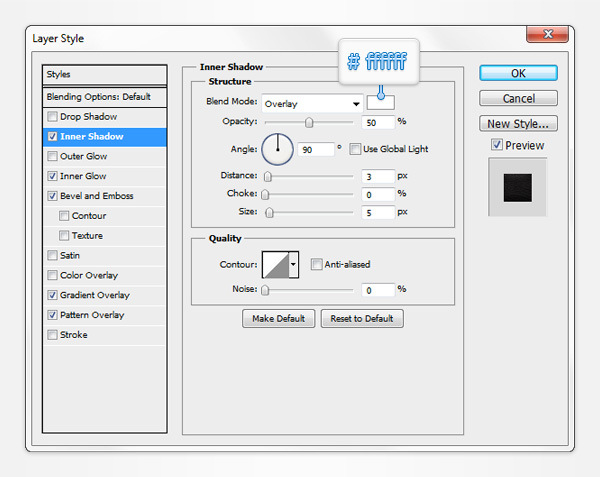
Step 3
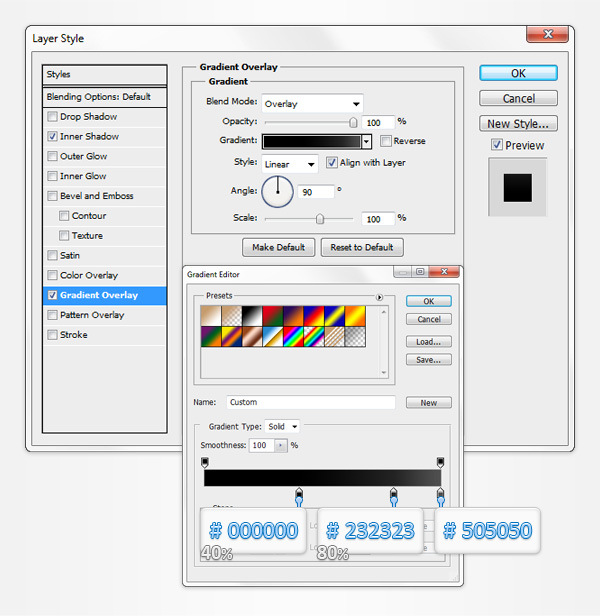
Move to the Layers panel (Window > Layers), name the existing vector shape "back" then double click on it to open the Layer Style window. Activate the Inner Shadow and the Gradient Overlay then enter the properties shown in the following images.

Step 4
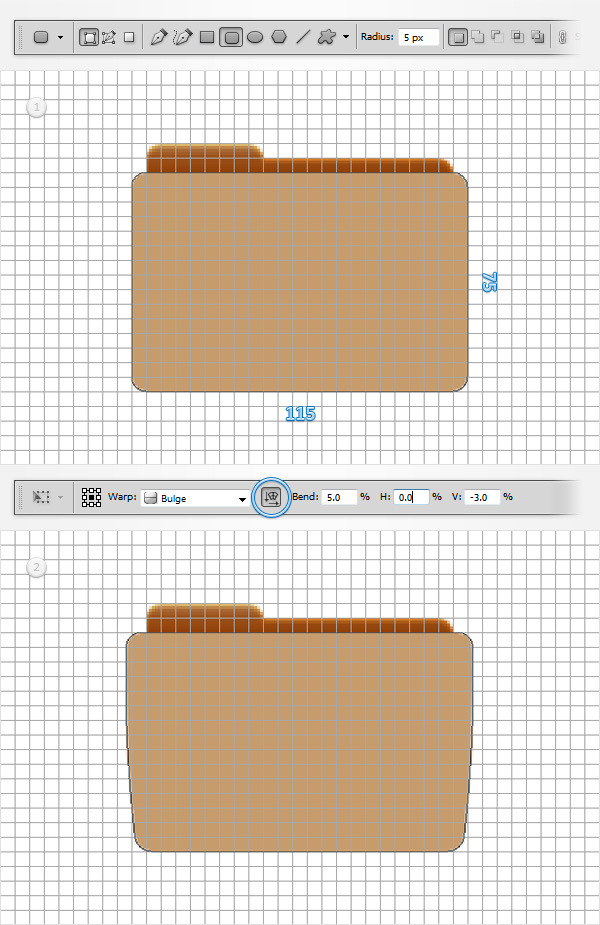
Make sure that the foreground color is still set at #c69c6d and grab the Rounded Rectangle Tool. Create a 115 x 75px vector shape, place it as shown in the first image and go to Edit > Transform > Warp. Focus on the top bar, select Bulge from the Warp drop-down menu, check the Orientation button, enter 5 in the Bend box, set the Vertical distortion (V:) at -3% then hit Enter.
In the end things should look like in the second image. Move to the Layers panel and simply name this new shape "front".
Step 5
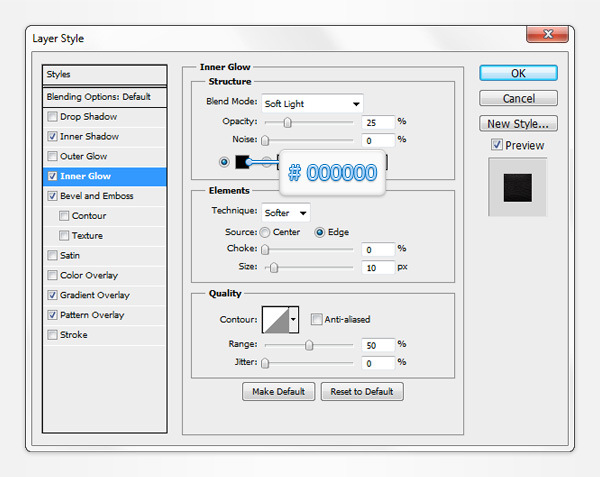
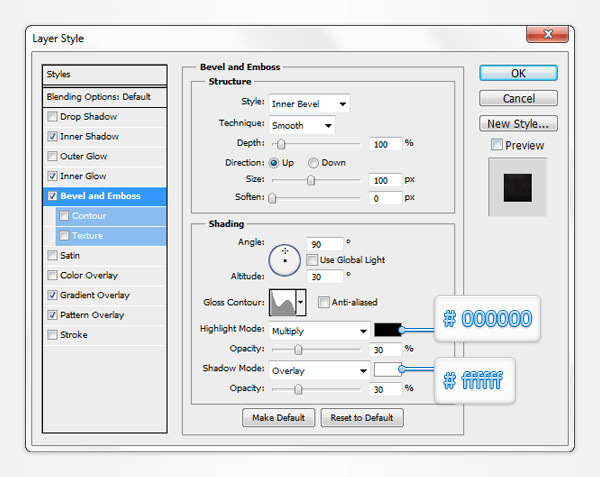
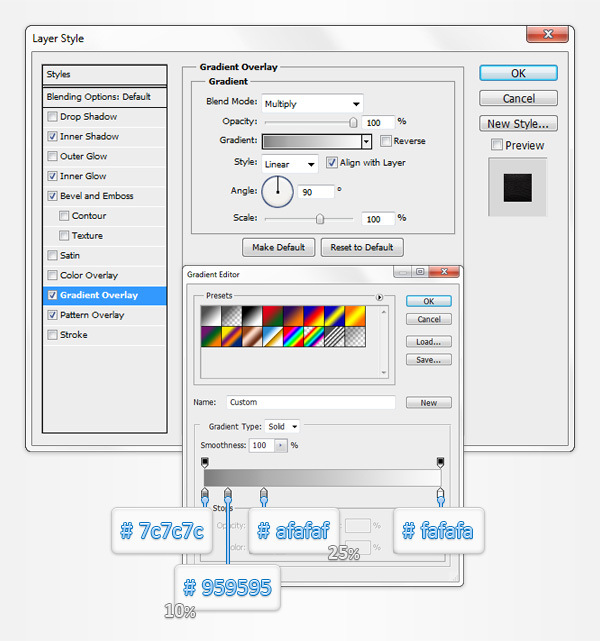
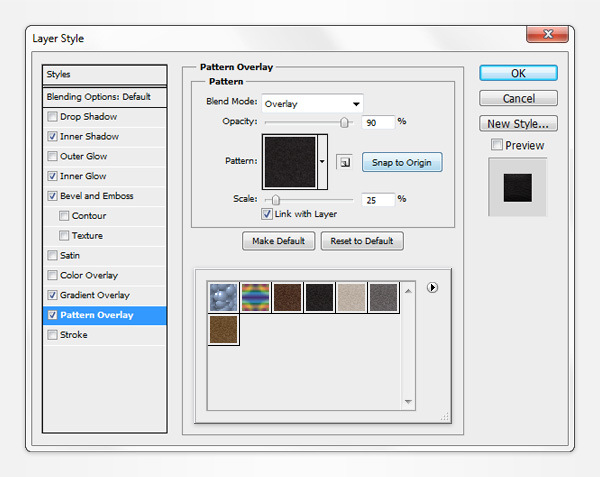
Open the Layer Style window for your "front" vector shape and enter the properties shown in the following images. For the Pattern Overlay section you will need the darkest pattern from Neutral Tileable Leather Patterns pack.
Step 6
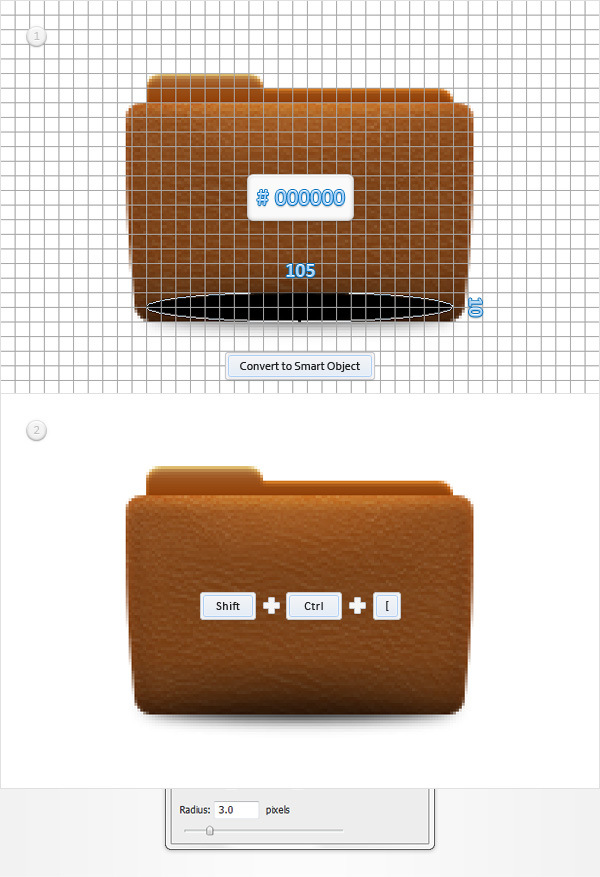
Set the foreground color at black and pick the Ellipse Tool. Create a 105 x 5px vector shape, place it as shown in the first image and move to the Layers panel. Right click on this new vector shape and simply go to Convert to Smart Object. Send this new smart object to back (Shift + CTRL + [ ) and go to Filter > Blur > Gaussian Blur. Enter a 3px radius and click OK.
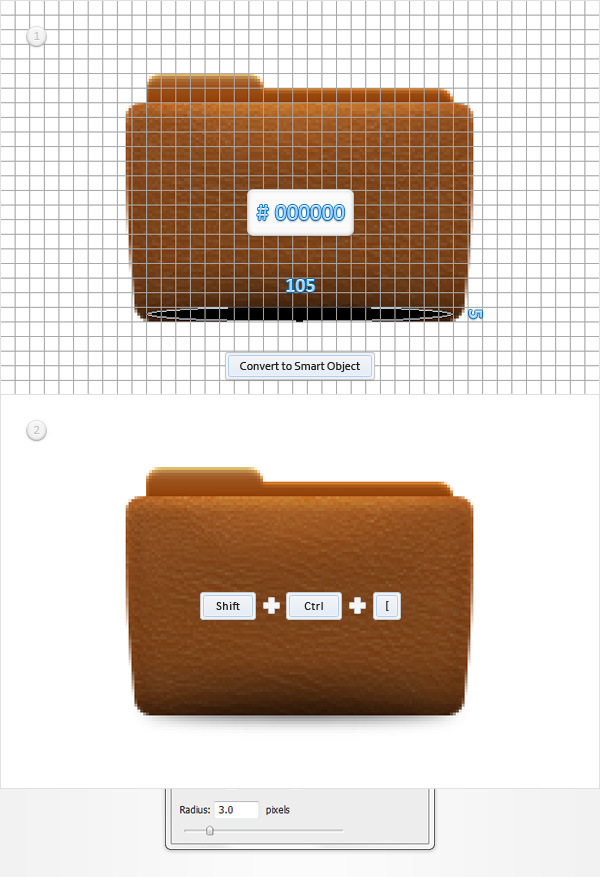
Step 7
Make sure that the Ellipse Tool is still active, create a 105 x 10px vector shape, place it as shown in the first image and move to the Layers panel. Convert this new vector shape into a smart object, send it to back (Shift + CTRL + [ ) and go to Filter > Blur > Gaussian Blur. Enter a 3px radius and click OK.
Step 8
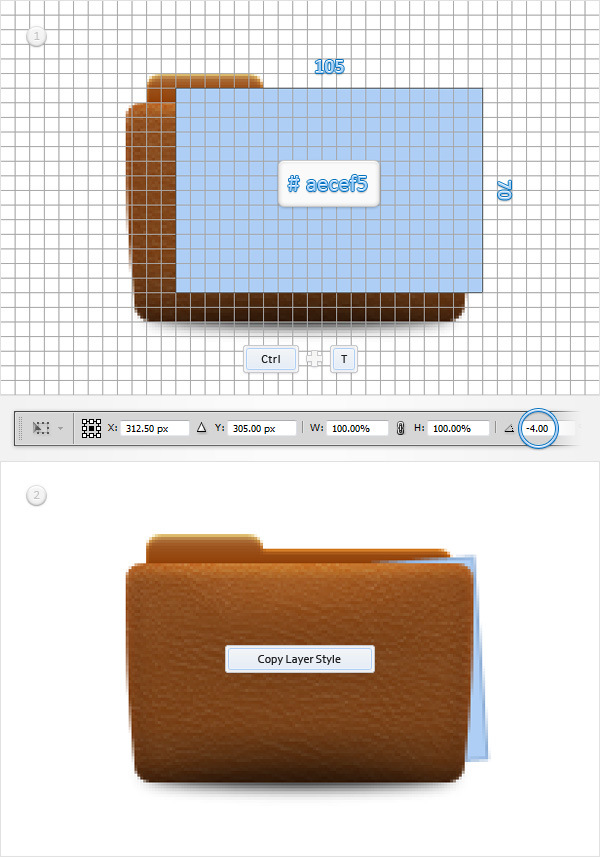
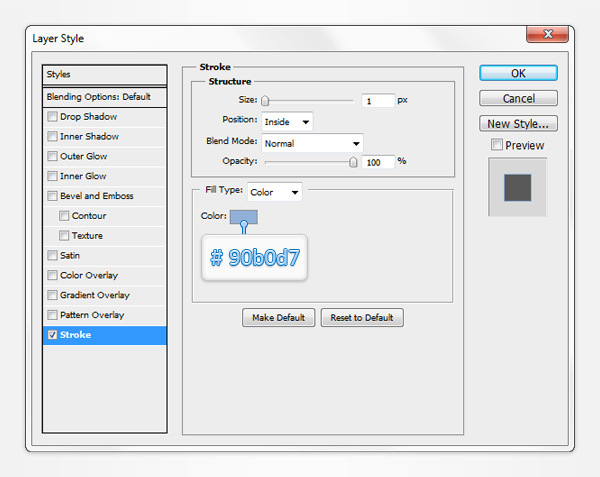
Set the foreground color at #aecef5, pick the Rectangle Tool, create a 105 x 70px vector shape and place it as shown in the first image. Make sure that this blue rectangle is selected and hit CTRL + T (or go to Edit > Transform > Rotate). Focus on the top bar, set the rotation angle at -4 degrees and hit Enter.
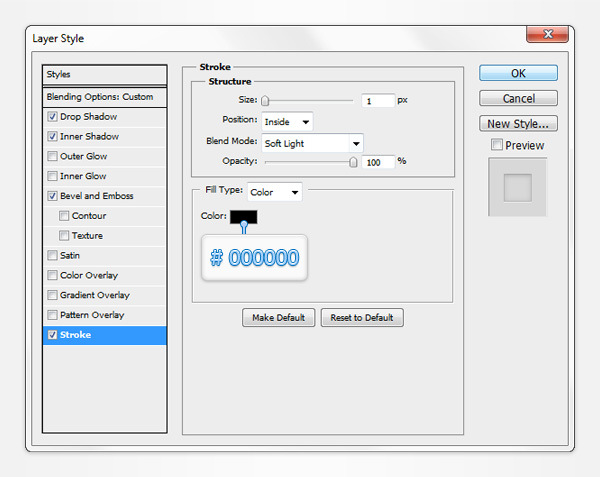
Move to the Layers panel and drag this new vector shape below your "front" shape. Open the Layer Style window for this blue vector shape, activate the Stroke, enter the properties shown in the following image and click OK. Return to the Layers panel, right click on your blue vector shape and simply go to Copy Layer Style.
Step 9
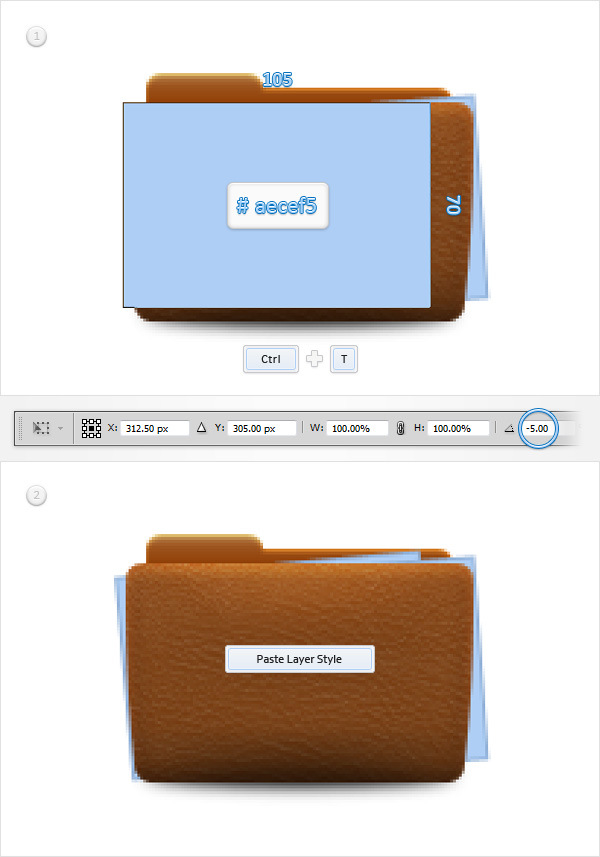
For the following steps you will need a grid every 1px, so simply go to Edit > Preferences > Guides, Grid & Slices and enter 1 in the Gridline Every box. Using the Rectangle Tool, create a 105 x 70px shape, place it as shown in the first image and hit CTRL + T. Set the rotation angle at -5 degrees and hit Enter.
Focus on the Layers panel, drag this new, blue shape below your "front" vector shape then right click on it and go to Paste Layer Style.
Step 10
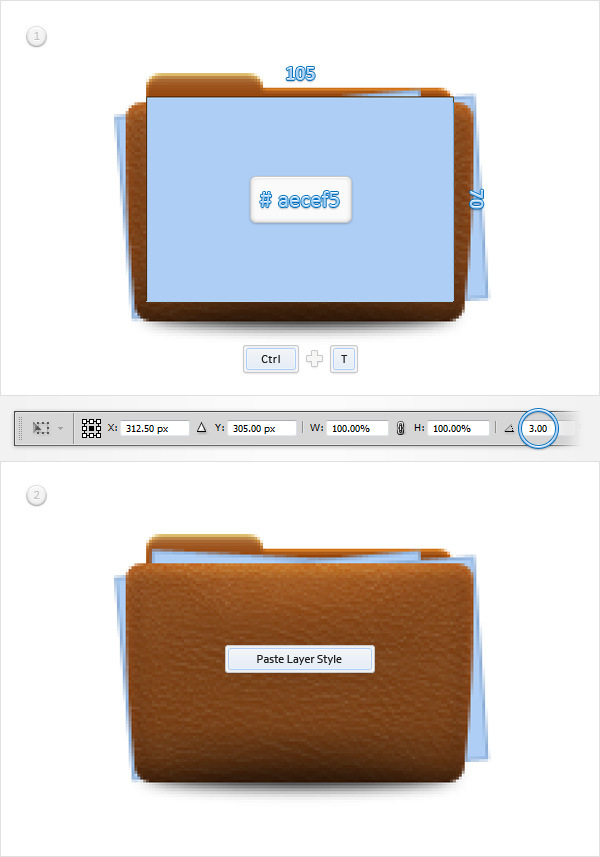
Make sure that the Rectangle Tool is still active, create a 105 x 70px shape, place it as shown in the first image and hit CTRL + T. Enter a 3 degrees rotation angle and hit Enter.
Focus on the Layers panel, drag this new, blue shape below your "front" vector shape then right click on it and go to Paste Layer Style.
Step 11
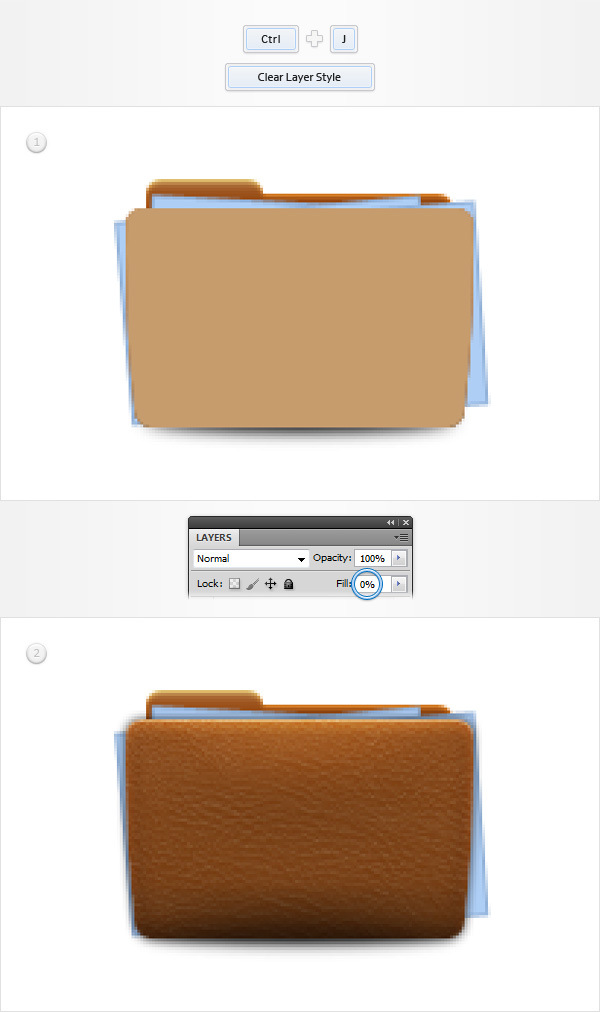
Disable the Grid (View > Show > Grid) and duplicate your "front" vector shape (CTRL+ J). Focus on the Layers panel, right click on this copy and go to Clear Layer Style.
Make sure that this copy stays selected, lower the Fill to 0% then open the Layer Style window and enter the properties shown in the following images.
Step 12
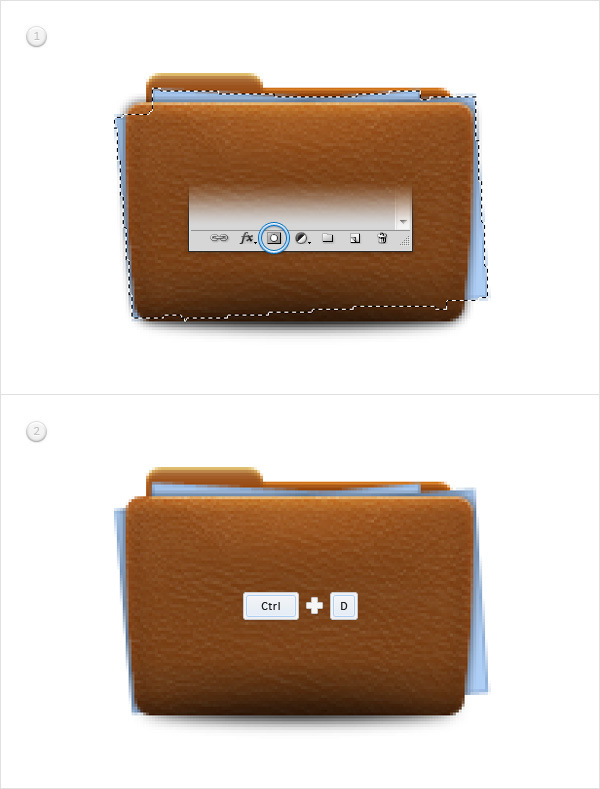
Focus on the Layers panel, hold the CTRL key from your keyboard and click on the bottom, blue vector shape. Next, hold the CTRL and the Shift keys from your keyboard and simply click on the other two blue vector shapes. In the end you should have a selection around all three blue vector shapes. Reselect the "front" copy made in the previous step and hit the Add Layer Mask button from the bottom of the Layers panel.
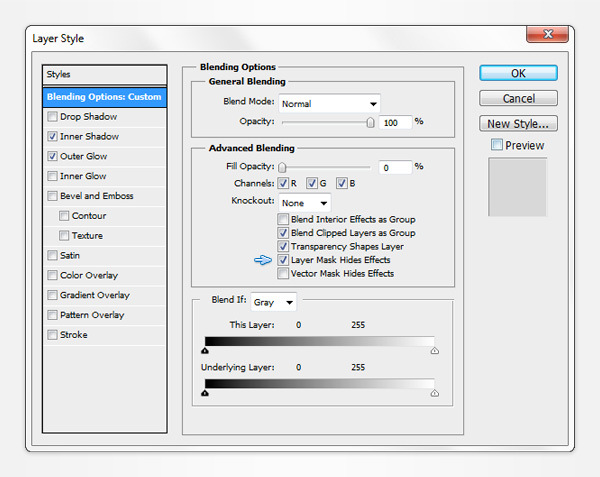
Open the Layers Style window for this masked vector shape and simply check the Layer Mask Hidden Effects box. Finally, hit CTRL + D to get rid of that selection.
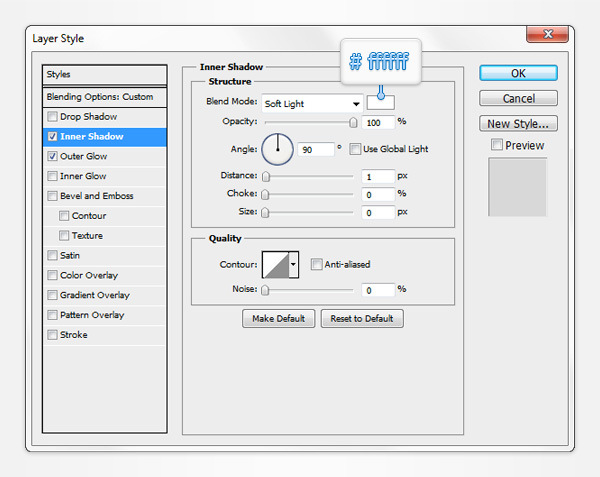
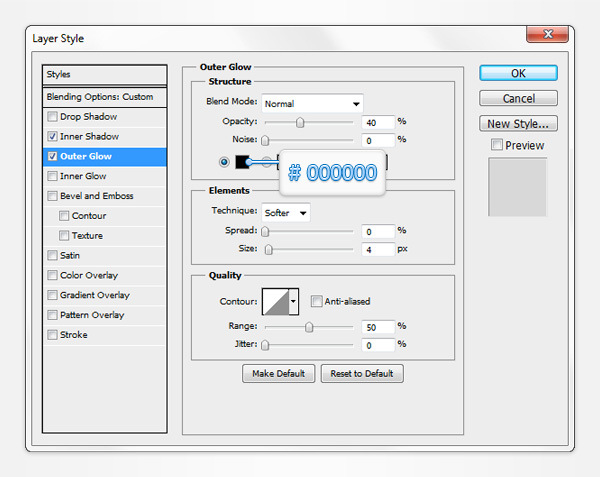
Step 13
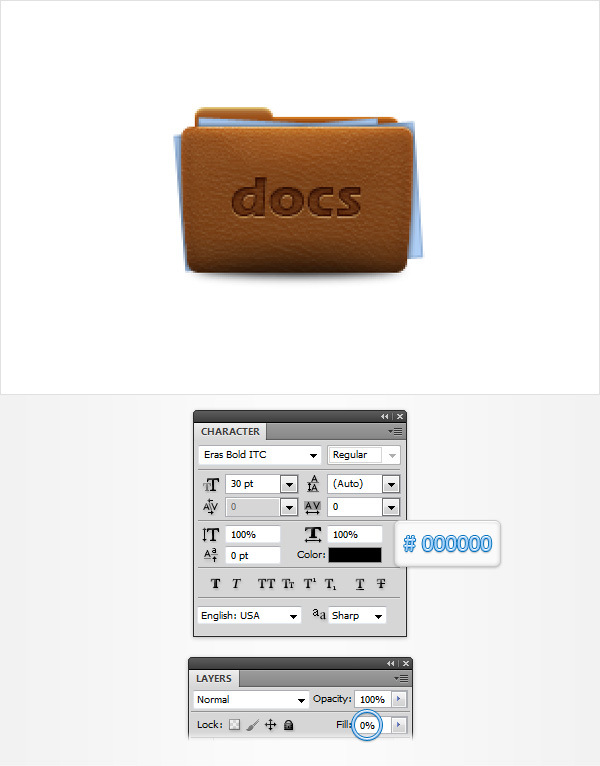
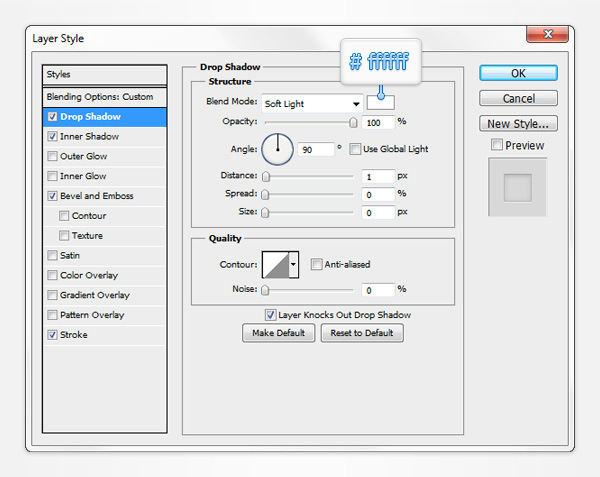
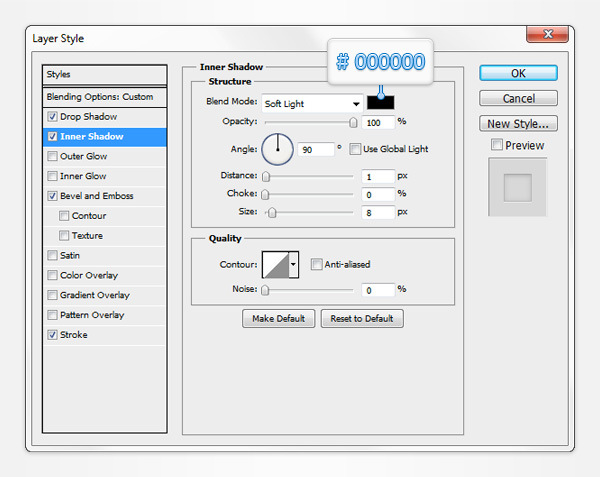
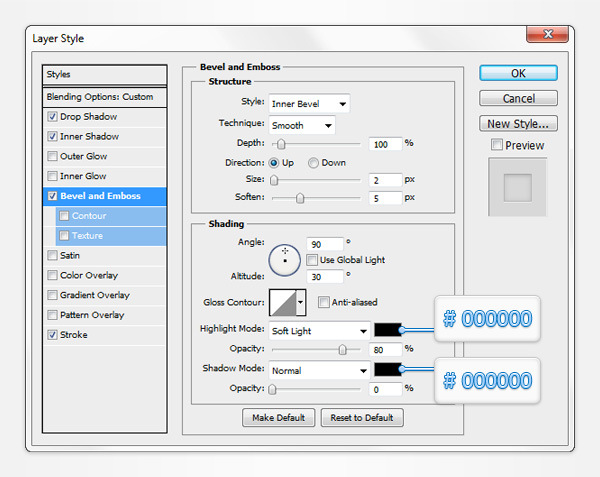
Using the Horizontal Type Tool add a simple piece of text as shown in the first image. Use the Eras Bold ITC font with the size set at 30pt and pick a random color. Make sure that your piece of text is selected, lower its Fill to 0% then open the Layer Style window and enter the properties shown in the following images.
Step 14
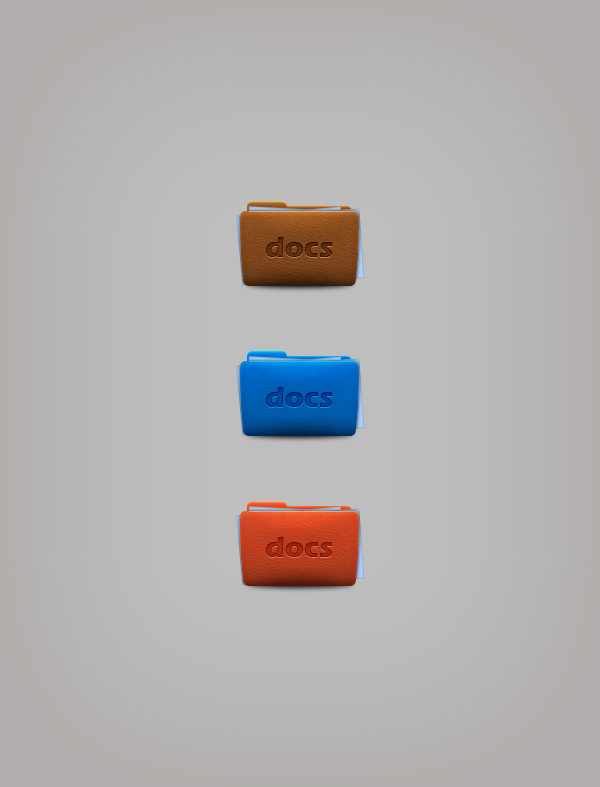
Finally, here’s how you can easily change the color of the final icon. Move to the Layers panel, focus on the vector shapes with the color set at #c69c6d and simply replace it with a color that you prefer.
And We’re Done!
Here is how your final result should look.